13.15 Adding A New just:out Engine
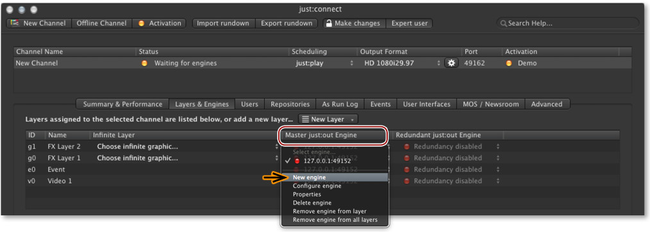
To configure a new just:out engine, select a channel and activate the "Layers & Engines" tab. Click on "Select engine..." or click on an existing engine and choose "New engine" to add a new engine.
A window with three tabs will appear, allowing you to define the engine attributes, define repositories and to configure the optional streaming output.
Network
- Name: type in a name for this engine, so you can identify the engine later.
- IP address: type in the IP address of the machine which is running the remote just:out and the port which has been defined in the just:out preferences there.
- just:control checkbox: activate this checkbox in case you use the just:control failover solution in a redundant environment.
Video device & output: Select the hardware you'd like to use for the final output:
- Screen: if there is no video hardware available for the final output on the machine running the just:out engine.
- AJA: in case you have a Kona card or Io (XT or 4K) device from AJA installed on the machine running just:out.
- Blackmagic: in case you have a Decklink card or UltraStudio device from Blackmagic installed on the machine running just:out.
Select a higher "Video buffer" if the data rate needed for playing the video and graphic files is high and/or the continuous data rate your storage system is able to deliver is low. If your storage system can deliver a very high continuous data rate and the data rate needed to play the video and graphics files is low, you can select a small video Buffer.
Audio Output: Configure the audio output here.
- Maximum audio channels: allows you to specify the number of audio channels played out by the selected device. This is helpful if a third party audio device (or an encoder for example) does not support "empty" audio tracks.
- Movie/live input delay: this is useful in case you have to adjust the AV synchronization because of a third party hardware which adds a delay to the video.
Once the engine has been configured, (re)start the engine and assign it to the layers of a channel you would like to use the new engine.


