/
13.11 Adding & Configuring an Engine (v2.5)
13.11 Adding & Configuring an Engine (v2.5)
- Copy Page Tree
- Georg Deisting
- Thomas Staiger
Owned by Copy Page Tree
After using the New Channel Wizard an engine is automatically created and added to the Channel. But there can be situations where you would like to:
- Separate the Video and the Graphics playout.
- Set up a redundant engine.
- Add several individual playout Channels to a single just:live user interface.
To make this work, a new engine has to be added.
Adding a New Engine
- Select a Channel.
- Activate the Layers & Engines tab.
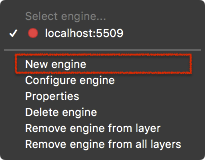
- Click on Select engine… or click on an existing engine.
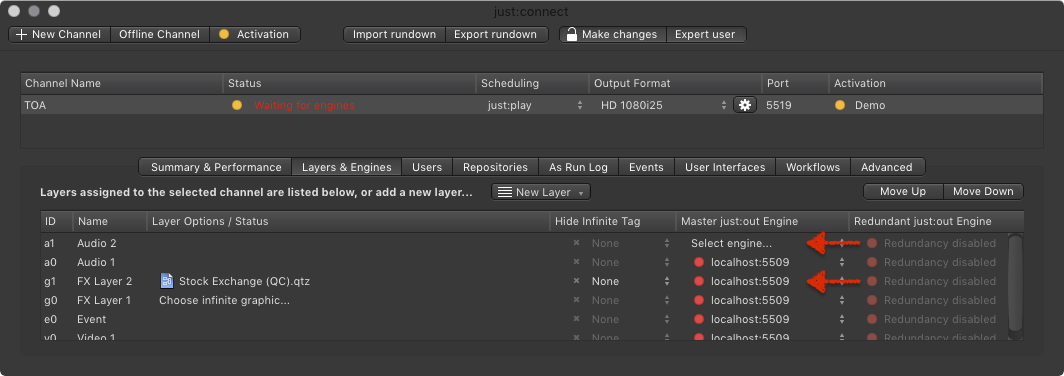
- In the menu, choose New engine to add a new engine.
Configuring an Engine
After selecting a new engine, this window appears. It allows you to define the Engine Attributes, define Repositories and to configure the optional Streaming Output.
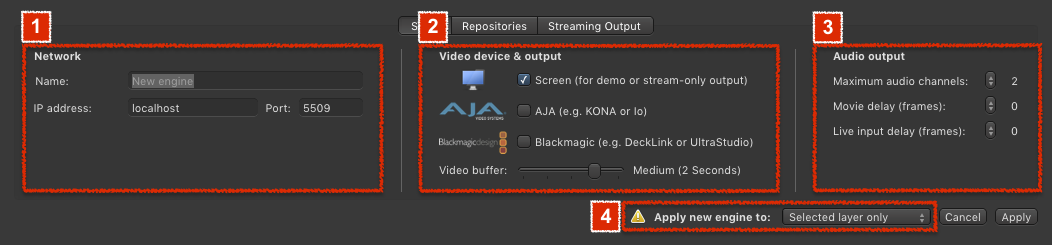
1. Network: Define how the new engine can be accessed via the network.
- Name: Enter the name for this engine, so you can identify the engine.
- IP address: Enter the IP address of the machine which is running the remote just:out and the port which has been defined in the just:out preferences there.
- just:control checkbox (not visible in this screenshot): Activate this checkbox in case you use the just:control failover solution in a redundant environment.
2. Video device & output: Select the hardware you'd like to use for the final output.
- Screen: If there is no Video hardware available for the final output on the machine running the just:out engine.
- AJA: In case you have an AJA device installed on the machine running just:out.
- Blackmagic: In case you have a Blackmagic device installed on the machine running just:out.
- Video buffer: Select a higher setting if the data rate needed for playing the Video and Graphic files is high and/or the continuous data rate your storage system is low. If your storage system can deliver a very high continuous data rate and the data rate needed to play the Video and Graphics files is low, you can select a small Video buffer.
3. Audio Output: Configure the audio output here.
- Maximum audio Channels: Allows you to specify the number of Audio Channels played out by the selected device. This is helpful if a third party Audio device (or an encoder for example) does not support "empty" Audio tracks.
- Movie delay: This is useful in case you have to adjust the AV synchronization because of a third party hardware which adds a delay to the Video.
- Live input delay: This is useful in case you have to adjust the AV synchronization because of a third party hardware which adds a delay to the live input.
4. Apply new engine to: Define the Layers the new engine will be assigned to. After that click the Apply button.
Once the engine has been configured, (re)start the engine and assign it to the layers of a Channel you would like to use the new engine.
, multiple selections available,
Related content
13.15 Adding A New Engine And Configure An Existing Engine (v2.0)
13.15 Adding A New Engine And Configure An Existing Engine (v2.0)
More like this
13.11 Adding & Configuring an Engine (v3.0)
13.11 Adding & Configuring an Engine (v3.0)
More like this
13.10 Adding and Configuring a New Engine (v.5.x)
13.10 Adding and Configuring a New Engine (v.5.x)
More like this
13.10 Adding and Configuring a New Engine (v.4.x)
13.10 Adding and Configuring a New Engine (v.4.x)
More like this
13.15 Adding A New just:out Engine
13.15 Adding A New just:out Engine
More like this
10. Just Control Basic Setup - Wizard (v.4.x)
10. Just Control Basic Setup - Wizard (v.4.x)
More like this