Inspector – Overview (4.0)
- Thomas Staiger
- Christian Schabasser
Table of Contents
Preface
The Inspector is used:
- to select your Capture Mode and Settings such as Naming Presets, Metadata Sets, Capture- and Destination Presets (Settings Tab)
- to create and adjust Channel Groups (Groups Tab)
- to connect Channels to the Channel Viewer Area (Connections Tab)
- to set Markers (Marker Tab)
This chapter explains all Inspector options and also shows how the Inspector changes depending on the currently selected Capture Mode.
Before you are able to use the Inspector it is mandatory that one of the Channel Viewers in the just:in User Interface is connected to a Channel which is configured and running in just:in Engine. Refer to the chapter just:in v4.0 Administrator Manual if you have not yet configured the Channel(s) yet.
General Inspector Overview
For detailed information on how to start a Recording please refer to the chapter Capture Modes.
The Inspector changes depending on the Capture Mode you are using. This shows the Inspector when in Crash Capture Mode. Many of the settings are the same for the other Capture Modes.

- Inspector Tabs: select the appropriate Tab here.
- Settings: general Tab for basic settings like File Naming, Timecode Source, Capture IDs, etc.
- Groups: the Groups Tab can be used for creating/adjusting Channel Groups.
- Connections: within the Connections Tab all available Devices/Channels are listed. The list of Devices/Channels can be used for establishing to each individual Channel.
- Markers: the Markers Tab displays all available Marker Presets, which can be used then to add Markers to Recordings, which are then available within Premiere Pro (just:in mac only).
- Channel Name: displays the Name of the selected Channel (in this case "Virtual Device 1").
- Channel Mode Selection: select the Channel Mode.
- Clip:
- Naming preset: select one of the available Naming Presets.
- Name/Variables: depending on the selected Naming Preset the available Variables may differ. In this figure there's only one Variable called "Name".
- Resulting Filename: shows the resulting filename based on the Variables of the selected Naming Preset. The filename used for the recorded Video may be different if the file already exists in the filesystem.
- Timecode:
- Timecode: select a Timecode source (Computer Time, VTR, LTC…)
- Offset: define a Timecode offset.
- Stop on Timecode: define a Timecode where to stop the Recording.
- Metadata:
- Metadata Set: you can select a Metadata set, for example QuickTime. This provides several predefined Metadata fields for you to fill.
- Writes at: select whether the Metadata will be written at the Start or at the End of a Recording.
- Audio Monitor: you can listen to the Audio stream of the incoming Channel Signal to preview the Audio part in addition to the Video preview. This is for previewing only and will not replace a hardware device to check the audio quality or AV synchronisation.
- Enabling/Disabling a Single Audio Channel: click on the desired Audio Channel to enable/disable the Audio Preview.
- Enabling/Disabling all Audio Channels: hold the option key while clicking on any Audio Channel to enable/disable the Audio Preview for all Channels.
- Errors: if there are any errors they will be displayed in this section.
- Capture IDs: add or remove Capture IDs by using the "Plus/Minus" buttons.
- Capture Preset: select one of the available Capture Presets.
- Destination Preset: select one of the available Destination Presets.
- Inspector Bottom Bar:
- Use the dropdown box to select available groups.
- Use the buttons to start/stop a recording.
A Channel may have multiple Capture IDs and can therefore record in multiple formats. Keep in mind that this can put high load on the system(s) running just:in Engine. Thorough testing upfront is a must!
Crash Mode Inspector
The Inspector changes depending on the Capture Mode you are using. The Crash Recording Inspector is shown above.
Batch Mode Inspector
For detailed information on how to start a Recording please refer to the chapter Capture Modes.
The following shows the Inspector when using Batch Capture Mode.
- Clear all button: clears the Batch Log table.
- VTR Buttons: controls the VTR.
- Batch Log Table: lists batch entries which have been added with the Log button.
- Inpoint: the Capture inpoint.
- Outpoint: the Capture outpoint.
- Duration: the Capture duration.
- Rewind on completion: enable this to rewind the tape on completion.
- Log button: logs the previously defined Capture.
- Reset button: resets the current Capture.

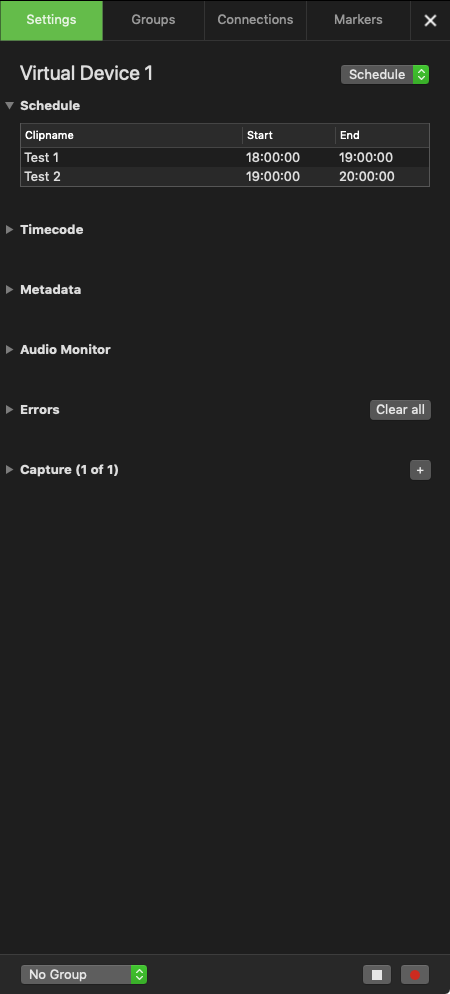
Schedule Mode Inspector
For detailed information on how to make a Recording please refer to the chapter Capture Modes.
This shows the Inspector when in Schedule Capture Mode.
- At the top of the Inspector all Apple Calendar Events for that particular Channel are listed.
- In Schedule Mode there is no record button available and recording will start and stop automatically accordingly to the start- and end-time of the Calendar events.
- In just.in you can use any Calendar which can be imported to the Apple Calendar app. This can be a local Calendar, an iCloud or gmail Calendar. If you need more information please → contact us.