4.3 Workbench
The Workbench organizes and views elements which are ready for being aired. just:live provides two views to do this.
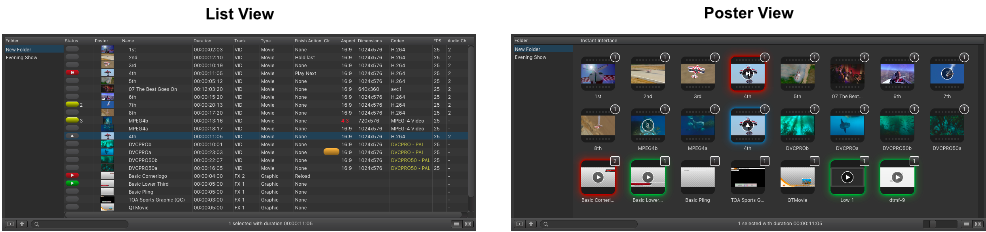
List View
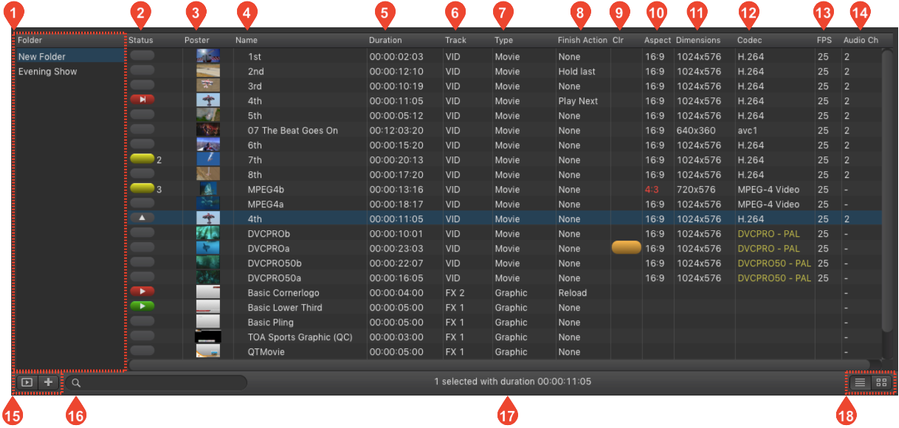
- Folder List: You can create folders to organize files. Click the "+" button in the lower left to add a folder. Press the backspace key to remove the selected folder.
- Status Column: Displays the status of items (see next chapter).
- Poster Column: Poster frames of items. Poster frames are generated automatically but can be changed in the Library before an item is added to the rundown. Once it is part of the rundown, the poster frame can not be changed anymore for this particular item.
- Name Column: Shows the names of Playlists and items.
- Duration Column: Durations of elements.
- Track: Displays the track on which the element will be played out.
- Type: Displays the type of an element.
- Finish Action: Displays the finish action of an element.
- Color Column: An item may have a color defined by selecting it in the Inspector. The color for each item is also shown in a column in the Workbench (if this column is enabled). When dragging and dropping items from the Library, the Finder color (if defined) will automatically be set for the item and shown in the Workbench.

- Aspect Column: This column shows the original aspect ratio of the Video with a color code:
- Yellow: Aspect ratio has been corrected to match the engine's aspect ratio.
- White: The aspect ratio of the Video and the engine is the same.
- Red: Aspect ratio has been changed and does not match the engine's aspect ratio anymore.

- Dimensions Column: Shows the pixel size of the element (how it will be shown on screen).
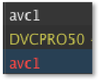
- Codec Column: Here you can see the codec of the Video with a color code which indicates the selected field order.
- White: Field order matches your engine's field order.
- Yellow: Field order has been changed automatically by just:play to match the engine's field order.
- Red: Field order has been changed manually by the operator but does not match the engine's field order anymore.
- FPS Column: Shows the frames per second of a Video. Only Videos with a frame rate which matches the engine's frame rate can be dropped into the rundown. Videos with another frame rate will be rejected when being dropped into the Workbench.
- Audio Channels: This column shows the number of Audio Channels of a Video.
- Folder Control:
- Folder View Button: Click this button to hide or show the folder list.
- Add Folder: Click this button to add a folder. Use the Inspector to rename folders.
- Search Field: Allows you to search for files in the Workbench.
- Item Count: Shows the number of items selected in the Workbench as well as the total length of the selected elements.
- View Control:
- List View: Activates the List View mode of the Workbench (as seen in the previous figure).
- Poster View: Activates the Poster View mode of the Workbench (as seen in the next chapters).
List View States
| Visual Representation | Type | Function | Special Function |
|---|---|---|---|
| Generic Item | This is an item which is not selected and not yet used in any context. | n/a |
| Selected Item | A selected item is highlighted in blue. Click the grey button to load the item to the Timeline. | n/a |
| Scheduled Item | The green status means that this item is the first item loaded in the Timeline and therefore ready for Playout. Clicking the green button plays the item. | Holding down the command-key while clicking the green button cues the first frame instead of playing the item. |
| Loaded Item | A yellow status means that this item is scheduled. It has to wait until the preceding items have finished. Each item of this type has a number beside it which indicates the scheduled order. | n/a |
| Playing Item | This item is currently playing out. Clicking the red button skips the playing item. | Holding down the shift-key while clicking the red button pauses the Playout of a Video. Pressing the red button again resumes the Playout. |


Poster View
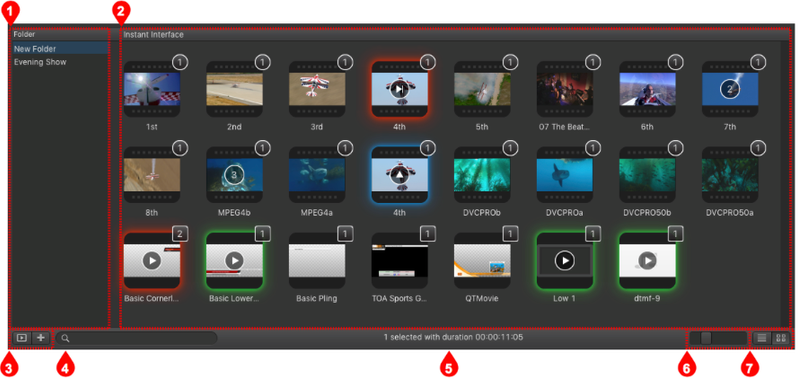
- Folder List: You can create folders to organize files. Click the "+" button in the lower left to add a folder – or press the backspace key to remove a selected folder.
- Instant Interface: Shows the content of the selected folder, where each element is displayed with its poster frame. The different symbols and colors are explained in the next chapter.
- Folder Control:
- Folder List Button: Click this button to hide or show the folder list.
- Add Folder: Click this button to add a folder. Use the Inspector to rename folders.
- Search Field: Allows you to search for files in the Workbench.
- Item Count: Shows the number of items selected in the Workbench as well as the total length of the selected elements.
- Poster Frame Size Slider: This slider adjusts the poster frame size.
- View Control:
- List View: Activates the List View mode of the Workbench.
- Poster View: Activates the Poster View mode of the Workbench.
Poster View States
The poster view uses different symbols and colors to display the content of your folders and the states of their containing elements.
| Not Selected Represents a Video/Graphic which is not selected. |
| Selected Represents a Video/Graphic which is selected. Clicking the arrow inside loads the item onto the target Layer you have defined in the Inspector. |
| Not Selected & Ready to Play Represents a Video/Graphic which is scheduled. This item is not selected and ready to play. Clicking the play button inside airs the item. |
| Selected & Ready to Play Represents a selected Video/Graphic which is scheduled. Clicking the play button inside airs the item. |
| Following Item Represents an item which is scheduled but currently not on air. Each item of this type has a number inside which indicates the scheduled order. |
| Playing This item is currently on air. |
| FX Layer This additional number in the upper right corner of a Graphics item shows the Layer in which the item will be loaded. This will not be shown if only one FX Layer is activated for this Channel. |
| Video Layer This additional number in the upper right corner of a Video clip shows the Layer in which this item will be loaded. This will not be shown if only one Video Layer is activated for this Channel. |