7.3 Adding Elements to your Rundown (v2.5)
There are several ways to add Videos, Gap elements, Live Events and Placeholders to your schedule.
Generic Instructions on how to add Elements to your Rundown
Drag one or multiple elements from the Library and drop them into an…
- empty area in the Calendar View. A Playlist that contains those elements will be added. The duration is automatically determined, based on the content of the Playlist.
- existing Playlist in the Calendar View. The elements will be added at the end of that Playlist.
- existing Playlist in the Workbench. While hovering above the Workbench the drop position is indicated by a small turquoise bar which appears between existing elements.
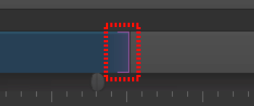
- existing Playlist in the Timeline. While hovering above the Timeline the drop position is indicated by a small blue bar which appears between existing elements.
It is not possible to add elements to the rundown whose drop point is in the past. This would change the current Playout and will therefore be rejected. A warning will be shown instead.
It is possible to drag and drop elements from the Finder. In case the engine is running on another machine, the files must be copied to the machine the engine is running on. It must be the exact same path. Ask your system administrator if you have questions.
Notes
- When the Video track of a Playlist with a predefined length is being filled with elements, the remaining Gap to the end of the current Playlist will be displayed.
- When the Video track of an Auto Duration Playlist is being filled with elements, the length of the Playlist will be automatically adjusted.
- In addition to drag and drop it is also possible to add elements via double click. Select an element in the Workbench and double click the element in the Library you would like to add to your rundown. This will add it below the selected element. This also works with multiple elements but not with folders. Double clicking a folder in the Library will open/close the folder but not add the elements to the rundown.
Adding Videos
Drag one or multiple Videos from the Library and drop them into an…
- empty area in the Calendar View. A Playlist that contains the Videos will be added. The duration is automatically determined, based on the content of the Playlist.
- existing Playlist in the Calendar View. The Videos will be added at the end of that Playlist.
- existing Playlist in the Workbench. While hovering above the Workbench the drop position is indicated by a small turquoise bar which appears between existing elements.
- existing Playlist in the Timeline. While hovering above the Timeline the drop position is indicated by a small blue bar which appears between existing elements.
It is not possible to add a Video to the rundown whose drop point is in the past. This would change the current Playout and will therefore be rejected. A warning will be shown instead.
It is possible to drag and drop Videos from the Finder. In case the engine is running on another machine, the files must be copied to the machine the engine is running on. It must be the exact same path. Ask your system administrator if you have questions.
Adding Gaps
Usually broadcasters try to avoid Gaps in the rundown. But there are situations where playing black for a few frames or even seconds is required, to adjust the start time of a certain Video for example. The default length of a Gap element is one second. You can modify the duration in the Inspector.
Drag a Gap element from the Library and drop it into an…
- empty area in the Calendar View. A Playlist that contains the Gap element will be added. The Playlist duration is automatically set.
- existing Playlist in the Calendar View. The Gap will be added at the end of that Playlist.
- existing Playlist in the Workbench. While hovering above the Workbench the drop position is indicated by a small turquoise bar which appears between existing elements.
- existing Playlist in the Timeline. While hovering above the Timeline the drop position is indicated by a small blue bar which appears between existing elements.
It is not possible to add a Gap element to the rundown whose drop point is in the past. This would change the current Playout and will therefore be rejected. A warning will be shown instead.
Creating Custom Gap Placeholders
- Go to the Library.
- Activate the Video tab.
- Open the Control folder.
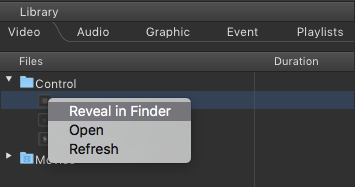
- Right click the Gap element and select Reveal in Finder.
- Duplicate the Gap.plist file and rename the duplicate.
- Edit the previously duplicated Gap.plist in a plain text editor to change the duration and other attributes.
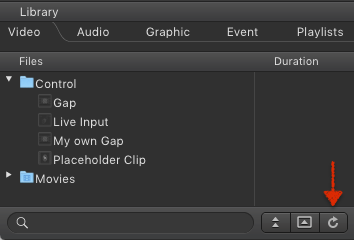
- Save and close the Gap.plist file. Then refresh the Library in just:play to see the new Gap file.
Adding Live Input
You can switch to a live signal by using the Live Input Placeholder element. The default duration is 30 seconds. You can modify the duration in the Inspector. At the end of a Live Event the next item in the Video layer of your rundown will be played out.
Drag a Live Input element from the Library and drop it into an…
- empty area in the Calendar View. A Playlist that contains the Live Input element will be added. The Playlist duration is automatically set.
- existing Playlist in the Calendar View. The Live Input will be added at the end of that Playlist.
- existing Playlist in the Workbench. While hovering above the Workbench the drop position is indicated by a small turquoise bar which appears between existing elements.
- existing Playlist in the Timeline. While hovering above the Timeline the drop position is indicated by a small blue bar which appears between existing elements.
It is not possible to add a Live Input element to the rundown whose drop point is in the past. This would change the current Playout and will therefore be rejected. A warning will be shown instead.
Creating Custom Live Input Placeholders
- Go to the Library.
- Activate the Video tab.
- Open the Control folder.
- Right click the Live Input element and select Reveal in Finder.
- Duplicate the Live Input.plist file and rename the duplicate.
- Edit the previously duplicated Live Input.plist in a plain text editor to change the duration and other attributes.
- Save and close the Live Input.plist file. Then refresh the Library in just:play to see the new Live Input placeholder.
Infinite Live Event
Each Live Input element has an Infinite Length option which can be enabled in the Inspector. When enabled, the clip has a pre-determined duration and an end time in the schedule but when this time is reached the Live Input does not end automatically. Instead, the just:out playout engine "holds" the Live Input until you manually dismiss it by clicking on the Play Next button found above the Timeline in just:play.
Whilst being held, any other items excluding the currently playing Graphic elements but including all Video or Graphic items in the same Playlist (or any following Playlists) are also held. They will appear to wait at the CTI line displayed in just:play. Once dismissed, just:out will calculate the difference between the pre-defined scheduled duration of the Live Input and the actual time played out. The following items will be rescheduled to compensate for this difference.
Live Input Rescheduling Behavior
- If the Live Input has been on air longer than planned, any following items and Playlists will be rescheduled for a later start time.
- If the Live Input has been on air shorter than planned, any following items and Playlists will be rescheduled for an earlier start time.
- Depending on the configuration of your system administrator, either the whole rundown in the future will be rescheduled (like described above) or only those items up to the next timed Playlist. Please contact your system administrator to find out which option is activated on your system.
- For an easy way to refine your rundown, use the Sync Point feature. This will allow you to edit/add/delete items in the Video track to preserve the start time of a prime time clip.
Adding Placeholders
In case a Video is not ready for playout but should be scheduled already, a Placeholder element can be used in the meantime. The default length is 30 seconds. You can modify the duration in the Inspector. Placeholder elements must be replaced by Video elements before the playout reaches the Placeholder's position.
Drag a Placeholder element from the Library and drop it into an…
- empty area in the Calendar View. A Playlist that contains the Placeholder element will be added. The Playlist duration is automatically set.
- existing Playlist in the Calendar View. The Placeholder will be added at the end of that Playlist.
- existing Playlist in the Workbench. While hovering above the Workbench the drop position is indicated by a small turquoise bar which appears between existing elements.
- existing Playlist in the Timeline. While hovering above the Timeline the drop position is indicated by a small blue bar which appears between existing elements.
It is not possible to add a Placeholder element to the rundown whose drop point is in the past. This would change the current Playout and will therefore be rejected. A warning will be shown instead.
Creating Custom Placeholders
- Go to the Library.
- Activate the Video tab.
- Open the Control folder.
- Right click the desired Placeholder Clip element and select Reveal in Finder.
- Duplicate the Placeholder Clip.plist file and rename the duplicate.
- Edit the previously duplicated plist file in a plain text editor to change the duration and other attributes.
- Save and close the plist file. Then refresh the Library in just:play to see the new placeholder.
Replacing Placeholders
When the Video is not yet available
- Select the Placeholder.
- Go to the Inspector.
- In the Name field enter the name of the Video (including the file extension). Once available, the Video must be placed into one of the root repository folders (not into a subfolder) defined for the channel.
- In the File menu use the Refresh Playlist command (cmd + R) to link the Placeholder with the Video and to reflect the change in the just:play user interface.
When the Video is available
- Go to the Library.
- Activate the Video Tab.
- Dropping a Video from the Library directly onto a Placeholder in the Workbench.
In case the length of the Video does not match the length defined for the Placeholder clip, a warning will be shown which informs you that the start time of the following Videos will be adjusted. Clicking OK adds the Video to the rundown and automatically adjusts the start time of the following items up to the next timed Playlist. Clicking Cancel will bring you back to the unchanged, previous state.
Adding Audio
Drag one or multiple Audio elements from the Library and drop them into…
- an empty area of a Playlist.
- the end of an already existing element in the Workbench, to add it right after that element.
It is not possible to add Audio files to the rundown whose drop point is in the past. This would change the current Playout and will therefore be rejected. A warning will be shown instead.
It is possible to drag and drop Audio elements from the Finder. In case the engine is running on another machine, the files must be copied to the machine the engine is running on. It must be the exact same path. Ask your system administrator if you have questions.
Adding Graphics
Drag one or multiple Audio elements from the Library and drop them into…
- an empty area of a Playlist.
- the end of an already existing element in the Workbench, to add it right after that element.
It is not possible to add Graphic items to the rundown whose drop point is in the past. This would change the current Playout and will therefore be rejected. A warning will be shown instead.
It is possible to drag and drop Graphics elements from the Finder. In case the engine is running on another machine, the files must be copied to the machine the engine is running on. It must be the exact same path. Ask your system administrator if you have questions.


