5.3 Library (v2.5)
The Library shows a filtered view of the repository folders defined in just:connect for the channel. Each tab shows the content of the repository folders in a similar fashion as the Finder's list view (including media related metadata).
Usage & Notes
- Scroll vertically to see all items stored in the repository folders.
- Scroll horizontally to see the media related metadata.
- Move the mouse to the beginning of a column separator, click-hold the mouse button and move the mouse to the left or right to change the column width.
- Click-hold a column header and move the mouse left or right to change the order of the columns.
- You cannot remove columns.
- Right clicking a file shows file level related options.
- Pressing the spacebar while a file is selected opens up Apple's QuickLook.
- You can hide/show and dock/undock the Library using the corresponding menu options in the View menu.
- You can navigate the Library like a Finder window (in list view) by using the arrow keys.
- To get more info about an item, place the mouse over it and wait for the popup message to appear.
- In case there are two Videos with the same name in the same folder but with different extensions, setting a new in/out-point and/or poster frame will apply the new settings for both Videos. Move the Videos to different folders to avoid this.
- Video Tab: Lists all Videos which are available for playout on your system. If a Video does not show up in the list but in the Finder, check if the file ends with one of the supported suffixes: mov, mpg, mpeg, mpegts, avi, mp4, 3gp, m4v, mkv, f4v, dv or mxf. Only files with a supported suffix are shown in the Library. Even though just:play displays any avi, mp4, mxf and mov file in the Library it is possible that a Video does not play out finally because the correct codec to decode the file is not installed on the system. Contact your system administrator for more info. Videos which do not match the output frame rate are highlighted in red and cannot be selected or added to the rundown. Also you can find the placeholders in the Video tab to switch to the live source, to add a gap to the rundown or to schedule a placeholder item for a Video which is currently not available.
- Audio Tab: Lists all Audio files from the repository folder(s) defined in just:connect. MP3, M4A and WAV Audio files are supported at the moment.
- Graphic Tab: Lists Graphic files from the repository folder(s). Only Graphic files with one of the supported suffixes are shown: composition, qtz, js, jscomposition, png or jpg.
- Event Tab: Here you can find router and GPIout Events which have been defined by the system administrator before. Such elements can be scheduled at any time by dropping them into the Event Layer in the Timeline.
- Playlists Tab: Lists all previously saved Playlists. Playlists can be saved to reuse them for the same channel but also to use them on another machine. Build a Playlist and select Save Playlist As… from the File menu to save it. You can also drop Playlists from the calendar view into the Playlist field. Final Cut Pro compliant XML files saved in the Playlist folder will show up here for immediate use also.
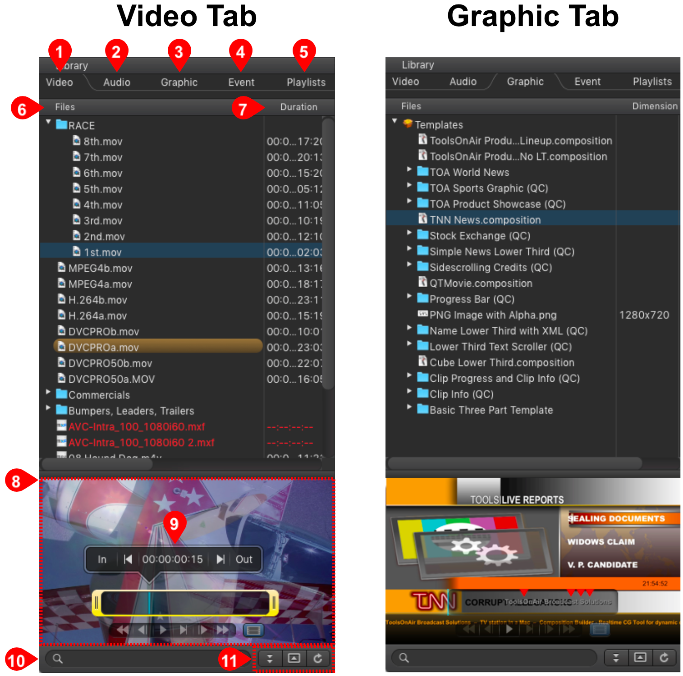
- Files: Lists all elements which are available (depending on the selected tab) for playout on your system.
- Metadata Columns: Depending on the selected tab you will see more or less metadata columns. You can rearrange and change the width of the columns by moving the elements in the header area. Metadata elements which are shown in red do not match the current playout format and will be changed automatically once added to the rundown. Red colored aspect ratio information means that the aspect ratio does not match, red colored codec information means that the field order does not match.
- Preview Area: Shows a preview of the currently selected element and allows you to:
- Video: Preview the Video (Audio is played out using the System Audio device), set an In/Outpoint, define a new Poster frame.
- Audio: No preview available.
- Graphic: Preview a Graphics file. In case it has a stop frame, the stop frame will be handled like On Air.
- Event: No preview. Instead you can click the "+" button at the bottom to build a new router control/GPI Event.
- Playlists: No preview.
- In/Out-Point and Poster Frame Control: See below.
- Search Field: Allows you to search for files and related metadata in the repositories. Click on the magnifying glass to select the metadata column you want to use for the search.
- Control Buttons:
- Sorting Order: Changes the sorting order (from A...Z or from Z...A) of the selected tab.
- Open/Close Preview: Shows or hides the preview area.
- Refresh: Refreshes the content of the Library. This is useful in all situations where the content of the Library is not updated automatically. This can be the case because your disk storage does not support file system events or in situations where the metadata sidecar file is not generated correctly. In this case, pressing the refresh button only writes new sidecar files, but does not overwrite already existing sidecar XMLs.
Red Coloured Files
- When no Metadata is shown the element cannot be added to the rundown. Usually this is because the frame rate of the Video does not match the frame rate of the playout format selected in just:connect.
Library Preview Controls
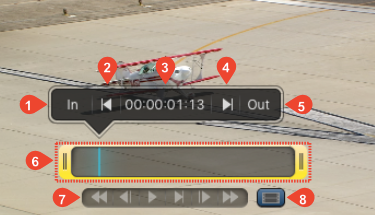
- Set In-Point (Videos only): Defines the in-point of a Video. Scrub the blue CTI and click on In to define a new in-point.
- Go to In-Point (Videos only): Moves the CTI to the in-point.
- CTI Position: Shows the timecode of the CTI position.
- Go to Out-Point (Videos only): Moves the CTI to the out-point.
- Set Out-Point (Videos only): Defines the out-point of a Video. Scrub the blue CTI and click on Out to define a new out-point.
- Trimmer and CTI (Videos only): The yellow trimmer is a visual representation of the in/out-point. Using the blue CTI you can scrub through the Video, which allows you to get a better overview.
- Control (Realtime graphics items can also be previewed here. Use the play button to start the preview and to release stop frames. Use the rewind button to jump to the beginning of a realtime graphic):
 Rewind
 Play/Pause
 Step One Frame Backwards
 Step One Frame Forwards
 Play Range
 Fast Forward
 - Set Poster Frame (Videos only): Defines the poster frame which will be used for this Video.
- When dragging a Video from the Library into the Workbench, the "active play" area marked in QuickTime Player is used to automatically set the Video's in- and out-point.
- Defining a new in/out-point and/or poster frame will write this information to the metadata XML sidecar file which has the same name as the Video file. The sidecar files are stored in the same repository as the respective Video files.
, multiple selections available,