/
Installation & Upgrade (just:in v2.5)
Installation & Upgrade (just:in v2.5)
This chapter covers the Installation & Upgrade process of just:in Engine and just:in.
In case of a previous Activation of any version prior to version 2.5 you will need a new activation code. Please contact ToolsOnAir to receive your updated activation code under software maintenance.
Important: Before you Install
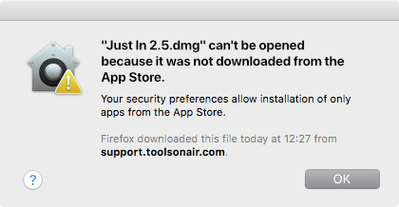
just:in comes as a disk image (DMG). To open the disk image the Security settings of the system must be changed.
- Open the System Preferences.
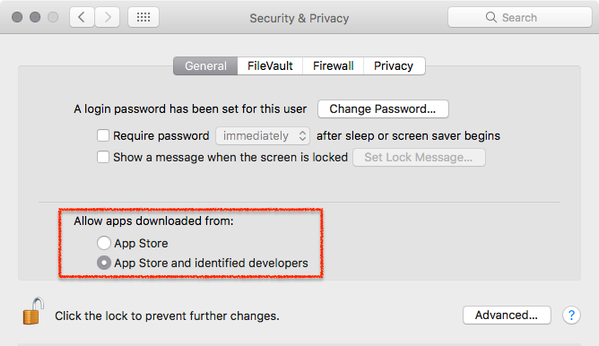
- Go to Security & Privacy.
- Click on the General tab.
- Unlock the Preference Pane.
- Change the setting to Allow apps downloaded from App Store and identified developers.
- You can now head to the point Download & Installation below.
Further reading (external link): → macOS Sierra: Open an app from an unidentified developer
Download & Installation
- → Download just:in from our Online Helpdesk (free account required).
- Extract the downloaded ZIP archive. If this dialog appears refer to → Important: Before you Install.
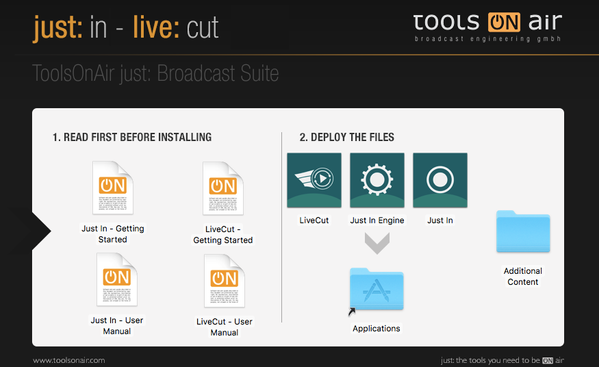
- The just:in disk image will show up.
- Copy Just In and Just In Engine to the Applications folder.
- If desired, add the Applications to your Dock.
- Follow the steps described in the next chapter Initial Setup.
Upgrading from a Previous Version
Upgrading from Version 1.8
- Go to the Applications folder.
- Delete the old version of just:in multi.
- Go to the folder /Library/Application Support/ToolsOnAir/Just In.
- Deleted the file config.xml.
- Follow the steps described above.
Upgrading from Version 2.x
Quit all just:in applications you would like to update and drag and drop them inside the .dmg window onto the Applications folder to update them to the new version.
, multiple selections available,
Related content
Software Installation & Upgrade (just:in Engine Mac v3.5)
Software Installation & Upgrade (just:in Engine Mac v3.5)
More like this
4. Software Installation & Upgrade (just:in Engine Mac v3.0)
4. Software Installation & Upgrade (just:in Engine Mac v3.0)
More like this
Software Installation & Upgrade (4.0)
Software Installation & Upgrade (4.0)
More like this
Installation & Upgrading (just:in v2.0)
Installation & Upgrading (just:in v2.0)
More like this
[JIM] Software Installation & Upgrade v.6.1
[JIM] Software Installation & Upgrade v.6.1
More like this
[JIM] Software Installation & Upgrade v.6.2
[JIM] Software Installation & Upgrade v.6.2
More like this


