3. just:play User Interface Overview & Preferences (v2.5)
just:play User Interface Overview
The following figure assumes that just:play uses the default window layout. If that should not be the case, reset the window layout by using the menu View → Reset Window Layout.
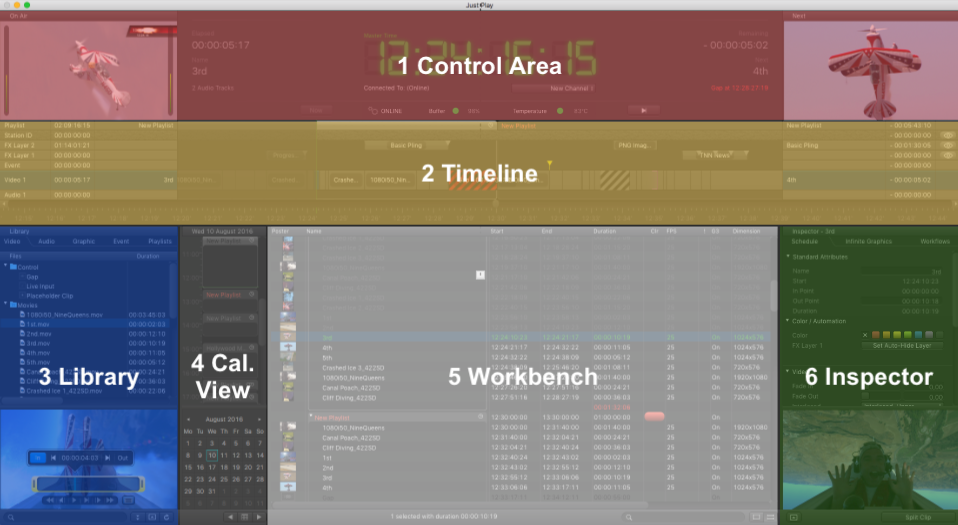
- Control Area: Gives an overview of the Playout at the current position of the Current Time Indicator ("CTI"), including the related information about the elapsed and remaining time, general warnings and the status of the just:out engine. The control area also allows the user to switch to another Channel and to skip the remaining part of the Video which is currently On Air (i.e. jumping to the next scheduled Video).
- Timeline: Shows the Layers available with this Channel as well as the name and the elapsed/remaining time of the elements currently/next on air. It also allows to add/change Videos, Graphic elements and Events (router controls + GPI triggers). The visibility of the final output is defined from top to bottom.
- Library: Divided in five tabs the Library shows Videos, Audio files, Graphic elements, Events and saved Playlists. Related metadata will also be shown (if available). There's also a search field and a preview at the bottom.
- Calendar View: Gives a proportional overview of the whole rundown by showing the scheduled Playlists in a vertical Timeline. Jump back and forth by a full day using the arrow buttons or the built-in calendar to go to any day in the future or past.
- Workbench: Shows the rundown in a traditional list view, where the content depends on the layer selection made in the Timeline.
- Inspector: Here you can modify the attributes of an item which is already scheduled. Multiselection of several items of the same kind is supported.
just:play Preferences
The actual setup and configuration of a Channel is done in just:connect by your system administrator (number of activated layers, usage of a FX layer for the station ID ("bug"), user permissions for a particular Channel…).
The preferences described here are related to the just:live UI installed on a particular machine. To open the preferences, go to the menu Just Play → Preferences.
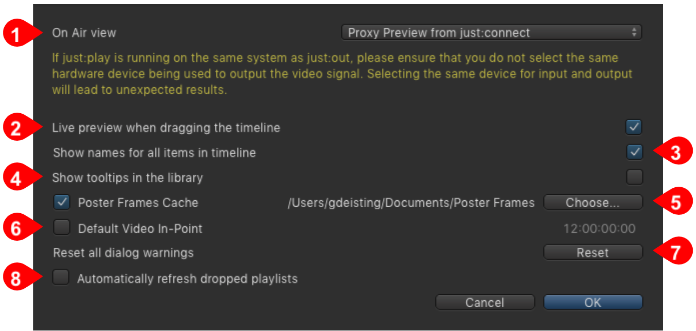
- On Air view: Here you can choose which preview is shown in the On Air View. The options are:
- No Live Preview: Shows the poster frame of the On Air item depending on the selected layer. The preview changes when switching from one Channel to another.
- Proxy Preview from just:connect: This shows the current output incl. Videos and Graphics as well as Audio bars (but not the passed through signal when using the DSK based Switch to Live method) in the On Air window. The preview changes when switching from one Channel to another.
- 2nd hardware device: This option shows any signal which is connected to a video device in the On Air window. This can also include the passed through signal while playing a Live Event even when using the DSK based switch to live method. Switching from one Channel to another Channel does not change the preview, but will always show the signal connected to the hardware device.
- Live preview when dragging the Timeline: With this option it is possible to disable the update of the "On Air" window while dragging the Timeline. Disabling this option improves the responsiveness of the user interface.
- Show names for all items in the Timeline: Activating this option will show the names of all items in the Timeline as an overlay. If this option is deactivated you can still move the mouse pointer above an item in the Timeline to see its name.
- Show tooltips in the Library: Deactivate this option to disable tooltips in the Library while moving the mouse pointer over entries. This option is enabled by default.
- Poster Frames Cache: This defines the folder where poster frames will be saved. By default the poster frames are saved in the folder "Poster Frames" inside of the "Documents" folder of the current user. This option is enabled by default. Disable it to suppress the creation of new poster frames in the workbench of just:play.
- Default Video In-Point: This option is disabled by default. Enable it to enter a timecode value. Once enabled the in-point of Videos which are dragged from the Library into a Playlist will be set to the specified value (assuming that the Video contains timecode). This is useful if all of your Videos contain a trailer or countdown before the actual video content starts.
- Reset all dialog warnings: Pressing the "Reset" button enables dialog warnings again.
- Automatically refresh dropped Playlists: Activating this feature automatically "refreshes" any Playlists when they are dragged from the "Playlists" tab (in the Library) and dropped into either the calendar or the workbench view. This is useful especially when you have older saved Playlists which do not include the necessary metadata for using the aspect ratio features and you want to automatically include them when dropping Playlists into the schedule.
- Depending on the size of the Playlist (= the number of video clips) the "Automatically refresh dropped Playlists" feature may slow down dropping Playlists into the schedule as each video clip in the Playlist has to be interpreted by just:play and the necessary metadata needs to be extracted.
- Using the proxy preview from just:connect shows a compressed image with a reduced frame rate. In addition the preview can stop for a moment if the communication is interrupted, even when the real output is fine. This means that the preview cannot replace a broadcast monitor for the final check of the master Playout.
, multiple selections available,