10. just:connect Basic Setup (v2.5)
- Copy Page Tree
- Georg Deisting
- Thomas Staiger
Option A: Creating a New Channel
When starting just:connect for the first time (or when adding a new Channel) you can use the New Channel Wizard to create a Channel.
- Start just:connect.
- The New Channel Wizard shows up.
- Make sure the New Channel checkbox is ticked.
- Follow the guideline below to configure your new Channel.
The New Channel Wizard
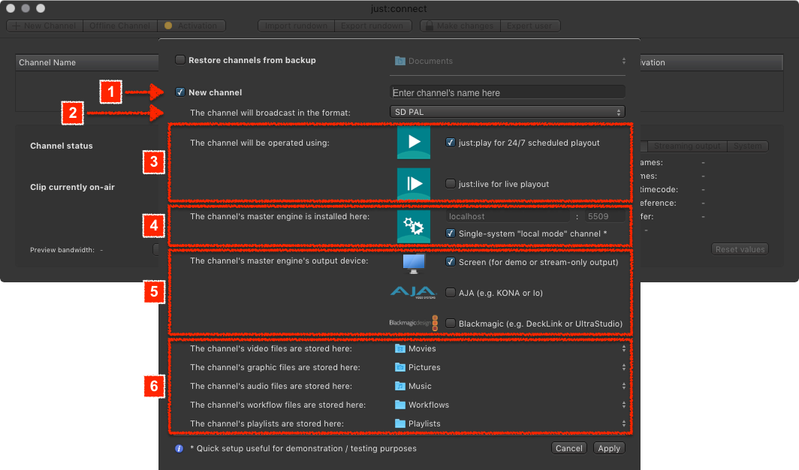
1. Enter the Name which should be used for the Channel.
2. Select the Format the Channel will use for broadcast.
- Make sure that the frame rate of your Videos is the same as the one selected here.
- You can change the frame rate of an existing Channel. Doing so will delete all existing rundowns from that Channel.
- The up/down/cross conversions offered by the AJA/Blackmagic Video hardware can be used independently of the selection here (depending on the device). In addition the just:out-based up/down conversion can also be used.
3. Select the Type of User Interface you would like to use with this Channel.
- just:play for 24/7 Scheduled Playout.
- just:live for Live Playout.
4. Define the Master Engine which should be used for this Channel.
- If just:out is installed on the same machine → Activate the Single-system "local mode" Channel checkbox.
- If just:out is installed on another machine → Deactivate the Single-system "local mode" Channel checkbox and enter the IP address of the machine where the just:out is installed you would like to use with this Channel.
By default we use port 49152 which should only be changed in case the port is already in use.
5. Define what kind of Video hardware you would like to use for the final output:
- Screen: in case there is no Video hardware available for the final output on the machine running just:out.
- AJA: in case you have a supported AJA Video device installed on the machine running just:out.
- Blackmagic: in case you have a supported Blackmagic Video device installed on the machine running just:out.
6. Define the paths to the Repository Folders which you would like to use as your main sources for the Videos, Graphics, Audio and Workflow files as well as saved Playlists.
Final Steps
- Click the Apply button when you are done.
- just:connect will present its main window.
- If there has been no other Channel configured before and the Single-system "local mode" Channel option has been selected, just:connect will automatically start just:out and the appropriate user interface (just:live or just:play) which is installed on the same machine.
- Using the New Channel Wizard the new Channel will have one Video Layer, one Event Layer, one Audio Layer and two FX Layers, independent of the license you bought. Once the license is used to activate the Channel, the amount of Layers will change depending on the activation code.
- Once the Channel has been created you can add more repository folders in just:connect.
Option B: Restoring a Channel from a Backup
When re-installing just:connect after a drive failure or in case you have started the "cold spare" just:connect on the redundant machine for the first time you can use the Restore Channels from Backup function to restore the Channel.
You need a Channel Backup to continue.
- Start just:connect to open the New Channel Wizard.
- Activate the Restore Channels from backup checkbox at the top.
- Copy the folder with the Channel Backup to the machine so you can select the folder with the backup here in the Wizard. Do NOT select single Channel Backup files.
- After selecting your Channel Backup Folder click Apply to rebuild the Channel and to start just:connect.
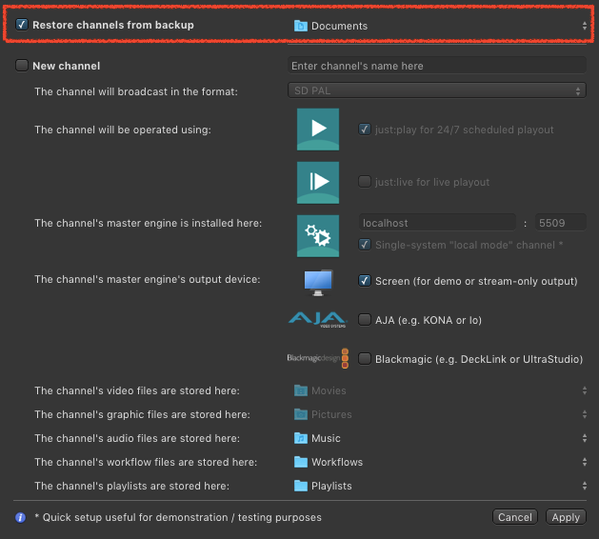
You will need a temporary license to activate this just:connect. Customers with a valid maintenance contract using the latest version of just:live/play can obtain a temporary activation code → here.