13.32 Workflows - failover:control (v2.0)
RELEASE NOTES:
v2.0 (724): BMD ATEM driver version ATEM Switchers 6.9 must be used. No other version can be used.
Starting with v1 it was possible to configure a redundant playout and with v2 we added the ability to configure an optional failover in case the master playout engine fails.
The failover:control is based on the engines status shown in just:connect and can be used in a fully redundant setup, where a master and a redundant engine is available, but also for channels where only a master engine is available.
Currently the following hardware devices are supported:
- AJA Kumo router
- 16x4 - up to 4 master channels
- 16x16 up to 8 master channels using master-redundant engine only, up to 5 master channels using master-redundant-failover
- 32x32 up to 16 master channels using master-redundant engine only, at least 10 master channels using master-redundant-failover
- BMD ATEM switch
- one device per master channel
- supports Media Player as the fallback source
In case the master engine fails, an email can be sent to a predefined email address AND failover:control will switch to:
- the redundant engine - if there is such an engine available 6.3 Redundant Setup (v2.0)
- the failover signal - in case there is no redundant engine available 6.2 Common (recommended) Setup (v2.0) but a failover signal.
The failover signal can be:
- an additional signal which is added to the AJA KUMO failover switch or
- an additional signal which is added to the BMD ATEM failover mixer or an image which is stored in one of the ATEM's Media Player.
The workflow parameter user interface provides a generic interface which allows the setup of the same functions independent of the hardware used for failover. Therefore it is possible to define parameters which do not match other settings (define an email address without having a mail server defined and even to set up settings which are conflicting with other settings (same source for different sources).
The setup of the failover:control is done using an on:core® based workflow which can be configured using the Workflow tab 13.31 Administrate Workflows (v2.0) of just:connect.
- To configure failover:control for a channel, select the channel first in the Channel View.
- Activate the ExpertUser tab.
- Click on Standardworkflows.
- A configuration window will be shown. Activate the checkbox right in front of Automatic failover and click OK.
After a few seconds the following window will appear:
failover:control workflow parameters:
 failover:control parameters:
Destination SDI Port: Type in the destination port you would like to use for the output signal
Device: select 0=no device (email only) 1=AJA Kumo 2=BMD ATEM
Device IP: Type in the IP address of the failover hardware.
Fallback Delay: This is the number of seconds the switch will be delayed, once the fallback signal is the only signal which is available. The value will be usually between 0 and 2, default 0.
Fallback Source: Type in the input port you would like to use for the fallback signal. The fallback signal is a third signal source which will be used in case the master and the redundant engine failed.
Mail Authenticate: NO=Mailserver does not need authentication YES=Mailserver needs authentication.
Mail Enable SSL: YES=your mails server is configured to use SSL NO= your mailserver uses TLS or no authentication method.
Mail Enable TLS: YES=your mails server is configured to use TLS NO= your mailserver uses SSL or no authentication method.
Mail From: Type in the email address which should be used as the sender.
Mail Host: Type in the mail server address which should be used for the outgoing email (zB smtp.gmail.com)
Mail Password: Type in the password which is used to log in into the mail account.
Mail Port: Type in the port which is used for the SSL or TLS authentication.
Mail Recipient: Type in the email address which should be used as the receiver.
Mail User Name: Type in the mail address of the mail account you use to send the mails from.
Master Delay: This is the number of seconds the switch will be delayed, once the master signal is available again. The value will be usually between 0 and 10, default 8.
Master Source: Type in the input port you would like to use for the master signal.
Send Mail: NO=no email will be send YES=email will be send every time a switch is executed
Slave Delay: This is the number of seconds the switch will be delayed, once the redundant signal is available again. The value will be usually between 0 and 10, default 0.
Slave Source: Type in the input port you would like to use for the redundant signal.
- If the email notification has been configured, an email will be send every time a switch is executed and it will be sent, even if there is no failover hardware available.
- Use the input port number of the device which is used as master, slave or fallback source and the Label of the Media Player in case an ATEM Media Player is used as the fallback source.
- Click on OK to take over the parameters of this workflow. A Failover workflow will be added to the Project/Workflows like shown here:
failover:control workflow parameters: |
Shows the status of the failover:control.
|


The status of the workflow is not only shown here in just:connect, but also in the just:play user interface:
Master engine output is sent to destination SDI port: | Redundant engine output is sent to destination SDI port: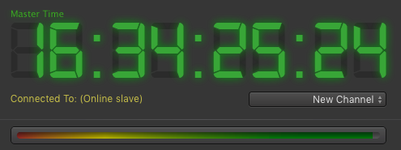 | Fallback signal is sent to destination SDI port: 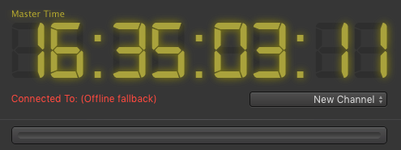 |
