Table of Contents
Accessing the Network Settings
Before continuing make sure to read the article Connecting to the just:store Web-based Administration User Interface
Click on Network in the sidebar.

The Network Overview will be shown, allowing you to configure the network interfaces.
Network Overview

To see the Network Overview press the tab “NETWORK OVERVIEW“ as you can see above.

Network Overview: Columns
Active: the state of the connection, can either be online (green check mark) or offline (red exclamation mark).
Name: displays the name of the connection.
Device: displays the network interface device of the connection.
Cable Status: shows if a fibre channel or ethernet cable is connected.
Speed: shows the type of network interface.
Actual Speed: shows the maximum speed of the network connection.
Method: IP address acquisition method (either DHCP or manual).
IP Address: shows the address of the connection.
MTU: shows the maximum transmission unit of the connection.
Actions: allows you to edit or delete a connection.
Changing the Hostname
Press the Change the Hostname… button.

Edit the Hostname.

Press the Change Hostname button.
Managing and Editing Network Connections
Creating a new Network Connection
Click on the Add a Connection… button in the lower right area.

Configure the network connection to your needs (details below).

Press the Add Connection button when you’re done.
Network Connection Settings
Interface: the network interface for the selected connection.
Connection Name: set a custom connection name here, if desired.
IP Type: IPv4 or IPv6
Method “Manual”: manual address configuration.
Method “DHCP”: retrieves the address configuration from a DHCP server automatically.
IP Address: if method is set to Manual, you need to provide an IP address here.
Subnet Mask: if method is set to Manual, you need to provide a subnet mask here.
Gateway: shows the gateway of the connection and can be edited when the method is set to Manual. For a direct connection to a single client please leave this field empty.
DNS: shows the DNS server of the connection and can be edited when the method is set to Manual. For a direct connection to a single client please leave this field empty.
DNS #2: shows the DNS server of the connection and can be edited when the method is set to Manual. For a direct connection to a single client please leave this field empty.
MTU: select 1500 for 1Gbit connections or 9000 for 10Gbit connections.
AutoConnect: if enabled, a failed connection will be re-established, if possible.
AutoConnect Priority: set a priority if required or set it to zero for automatic order.
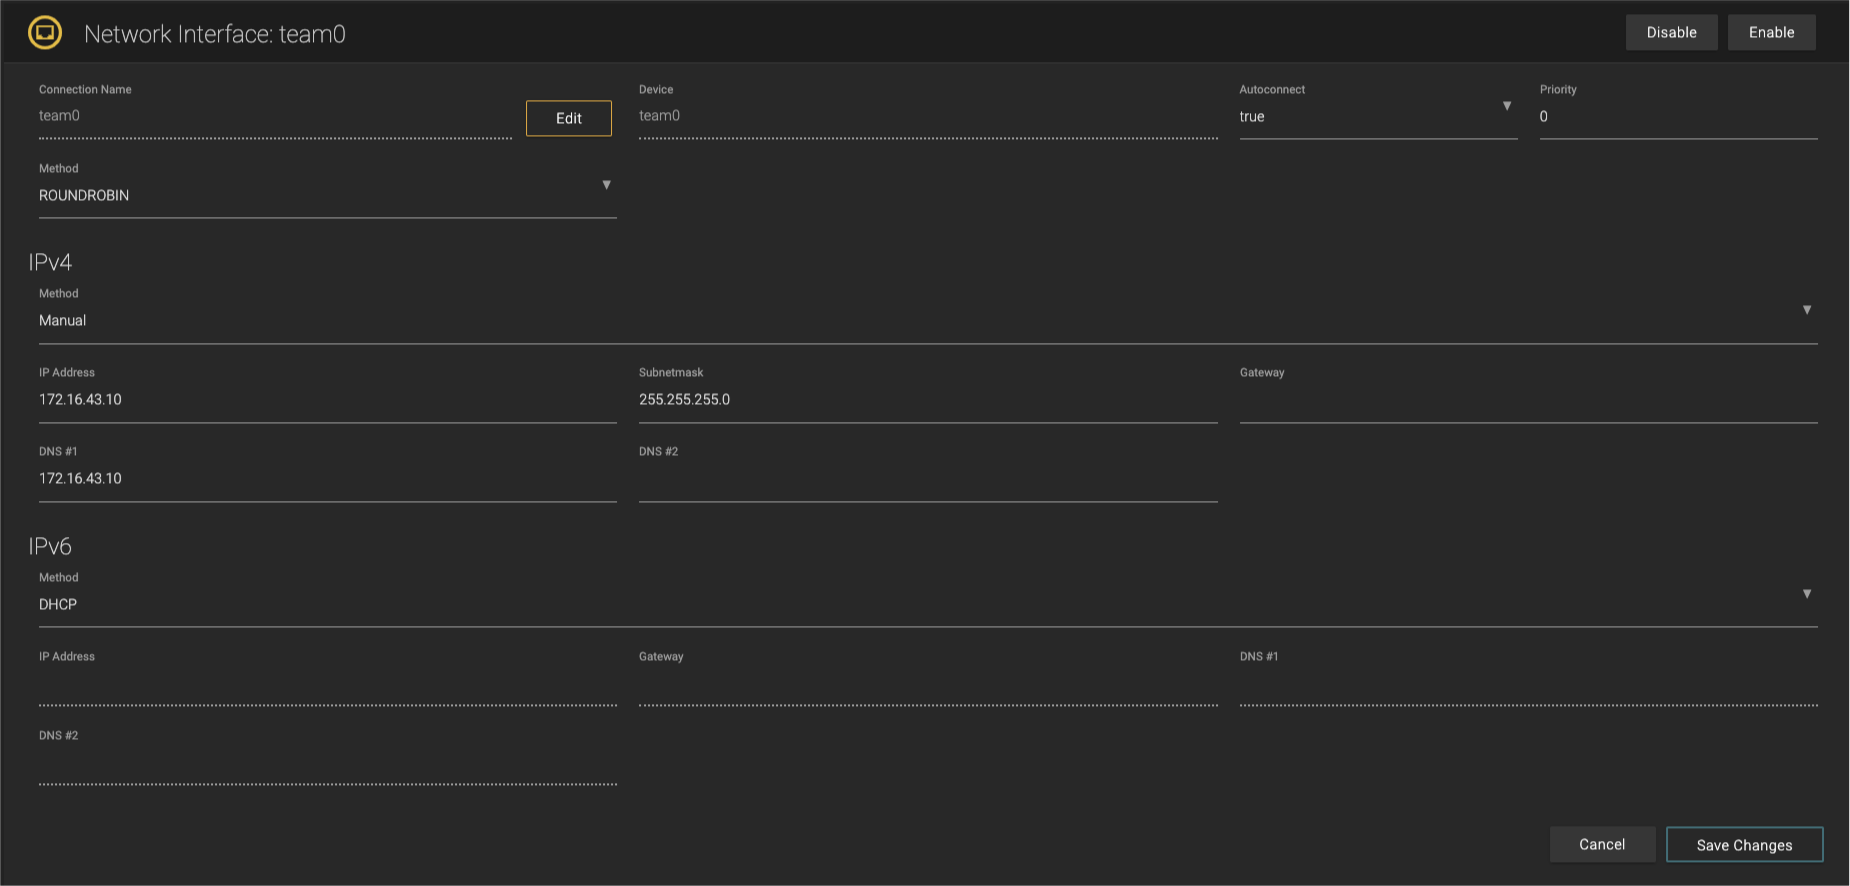
Editing a Network Connection
Press the Edit button of the network interface you want to edit.

The network interface overview shows up.
Make your changes and press the Save Changes button afterwards. The network interface will then be restared.

Restarting a network connection will break all ongoing client connections to this connection.
Disabling and Enabling a Network Connection
Press the Edit button of the network interface you want to edit.
Press the Enable or Disable button in the upper right of the dialog.
Restarting a network connection will break all ongoing client connections to this connection.
Using Link Aggregation (Bonds, Teams)
This requires you to be logged in as an admin.
Creating a Bond
Press the Add a Bond… button.

Configure the bond to your needs.

Press the Add Bond button to create the bond.

The Network Overview will be shown. In case the desired bond is not shown, press the Show all Connections button below the network interfaces list.

Adding or Removing a Member to/from an Existing Bond
In case the desired bond is not shown, press the Show all Connections button below the network interfaces list.

Press the Edit button of the desired bond.

Click on the MEMBER OF BOND tab.

In the Interface drop-down box, select a connection that should be used as a member. The selected connection will be deleted and then added to the bond. Keep in mind that this will break all ongoing client connections to the corresponding connection.

Press the Add button to add the member, or the Delete button to remove it.

Configure the rest of the members, like Autoconnect and MTU.
Changing the Network Settings of an Existing Bond
In case the desired bond is not shown, press the Show all Connections button below the network interfaces list.
Press the Edit button of the desired bond.
Configure the network settings accordingly to your needs.

Press the Save Changes button to take over your changes.
Creating a Team
Press the Add a Team button.

Configure the team to your needs.

Press the Add Team button to add the team.

The Network Overview will be shown. In case the desired team is not shown, press the Show all Connections button below the network interfaces list.
Adding or Removing a Member to/from an Existing Team
In case the desired team is not shown, press the Show all Connections button below the network interfaces list.
Press the Edit button of the desired team.

Click on the MEMBER OF TEAM tab.

In the Interface drop-down box, select a connection which should be used as a member. The selected connection will be deleted and then added to the team. Keep in mind that this will break all ongoing client connections to the corresponding connection.

Click on the Add button to add the connection to the team, or press the Delete button to remove it.

Configure the rest of the members, like Autoconnect and MTU.
Changing the Network Settings of an Existing Team
In case the desired team is not shown, press the Show all Connections button below the network interfaces list.
Press the Edit button of the desired team.

Configure the network settings accordingly to your needs.
Press the Save Changes button to take over your changes.
Bandwidth Limitation
Due to the fact that the RAID controller and the SAS-Disks will have a maximum speed, we will then be able to manually set the throughput to the clients. The Bandwidth Limitation feature will help you to manage the maximal data throughput for each workstation or a complete subnet. We will limit the speed limitation immediately after applying the configuration. Therefore, the performance can increase in the short term to the maximum available bandwidth, and therefore problems at that time slot can happen.
Regarding the combination of system performance profiles with Bandwidth Limitation, the activated profile will handle the priority of the I/O operations and the Bandwidth Limitation will only affect the maximum available bandwidth for either a workstation or a subnet. Therefore, the network Bandwidth Limitation limits only the throughput of the client or subnet and won’t change the settings of the performance profiles. So if you have activated the Playout profile and configured a bandwidth limitation the effect would be due to that the amount of data is still the same and minor throughput, it will take longer. The write operations from another client would then not be affected (if the configured limitation are not involving the client with write operations).
For understanding this feature in more detail we prepared examples for you.
Example: Connection over Switch/Router

So in this case we have a “Connection over Switch/Router“ with one just:in linux (172.16.6.22), two edit workstations (172.16.6.20 & 172.16.6.21), and a just:play (172.16.6.19). All these “clients“ are connected through a 10 Gbit switch which is connected over a 10 Gbit connection to the just:store. So we will have a total bandwidth of 10 Gbit for all those clients and to avoid that some clients (which only need 50MB/s) will have equal bandwidth we will set Bandwidth Limitation rules as below:
172.16.6.19 will have a maximum bandwidth of 25MB/s for incoming and outgoing connections.
172.16.6.20 will have a maximum bandwidth of 200MB/s for incoming and outgoing connections.
172.16.6.21 will have a maximum bandwidth of 25MB/s for incoming and outgoing connections.
172.16.6.22 will have a maximum bandwidth of 500MB/s for incoming and outgoing connections.
Example: Direct Connection

So in this case we have multiple “Direct Connections“ with edit workstations (like Avid Media Composer, Adobe Premiere Pro, Final Cut Pro X, or Davinci Resolve Studio). All these “edit workstations“ are connected directly through a 10 Gbit connection to the just:store. So we will have a total bandwidth of 10 Gbit for each of those clients and to avoid that some clients (which only need ~120MB/s) will have the same amount of data throughput ( and won’t need that amount) we will set Bandwidth Limitation rules as below:
172.16.1.20 will have a maximum bandwidth of 200MB/s for incoming and outgoing connections.
172.16.2.20 will have a maximum bandwidth of 120MB/s for incoming and outgoing connections.
172.16.3.20 will have a maximum bandwidth of 120MB/s for incoming and outgoing connections.
172.16.4.20 will have a maximum bandwidth of 200MB/s for incoming and outgoing connections.
172.16.5.20 will have a maximum bandwidth of 200MB/s for incoming and outgoing connections.
172.16.6.20 will have a maximum bandwidth of 200MB/s for incoming and outgoing connections.
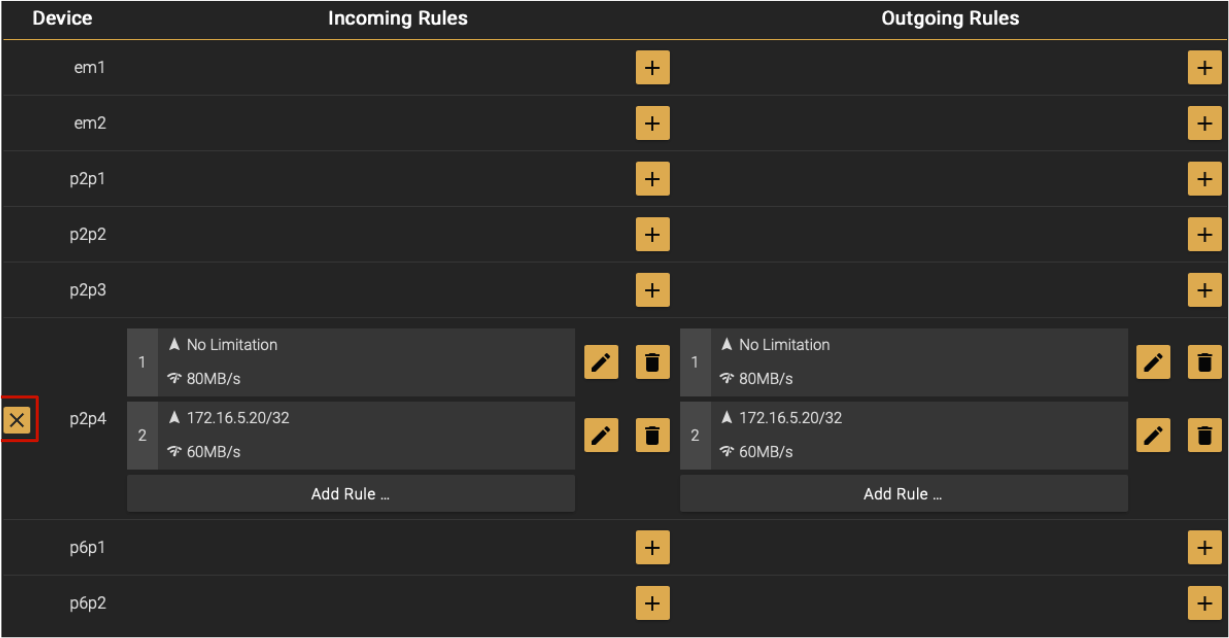
Bandwidth Limitation Overview

To see the Bandwidth Limitations press the tab “BANDWIDTH LIMITATION“ as you can see above.
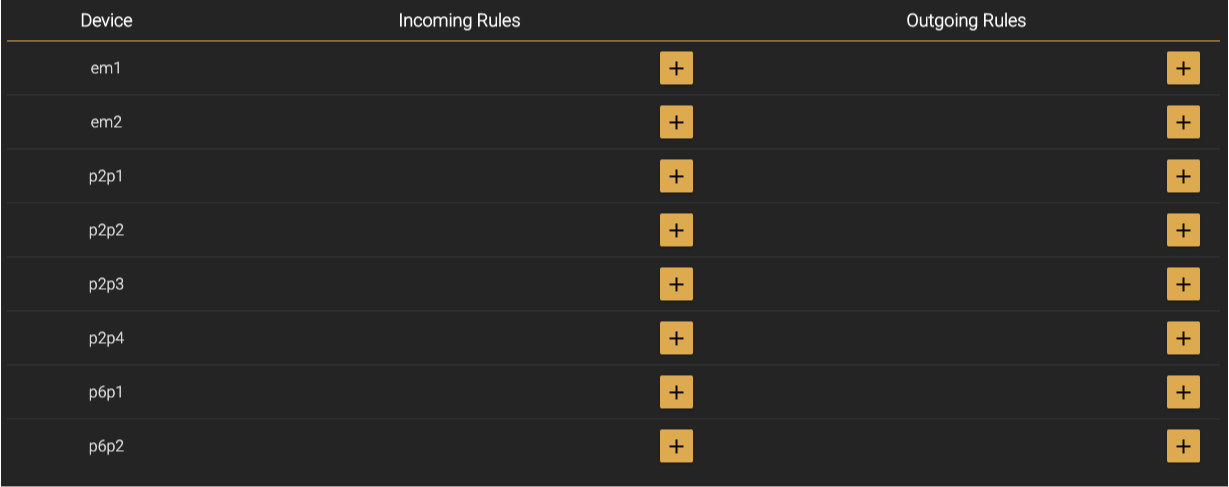
Device: shows the device for the limitation rule.
Incoming/Outgoing Rules: displays the destination and rate of the limitation rule.
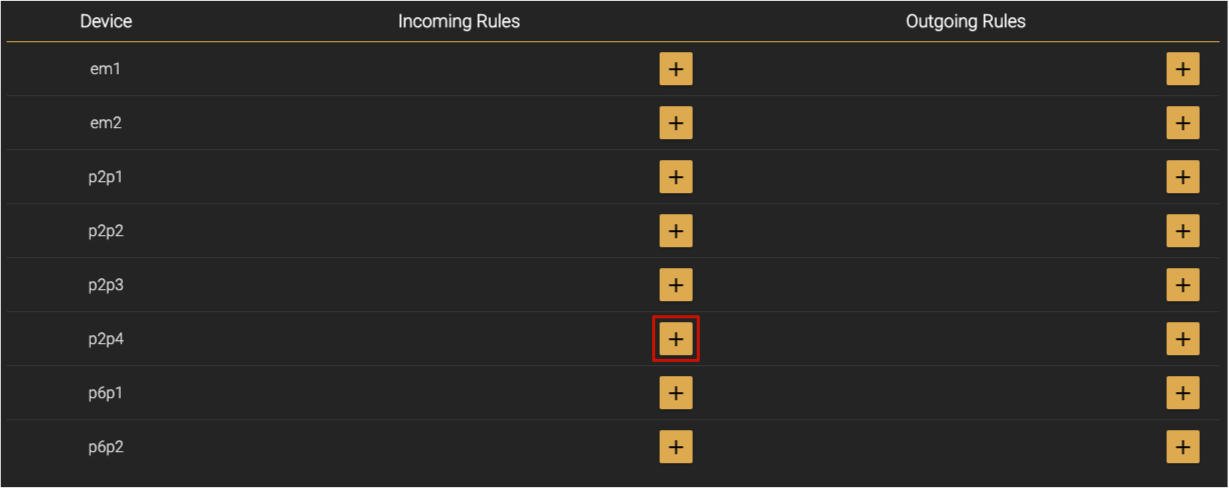
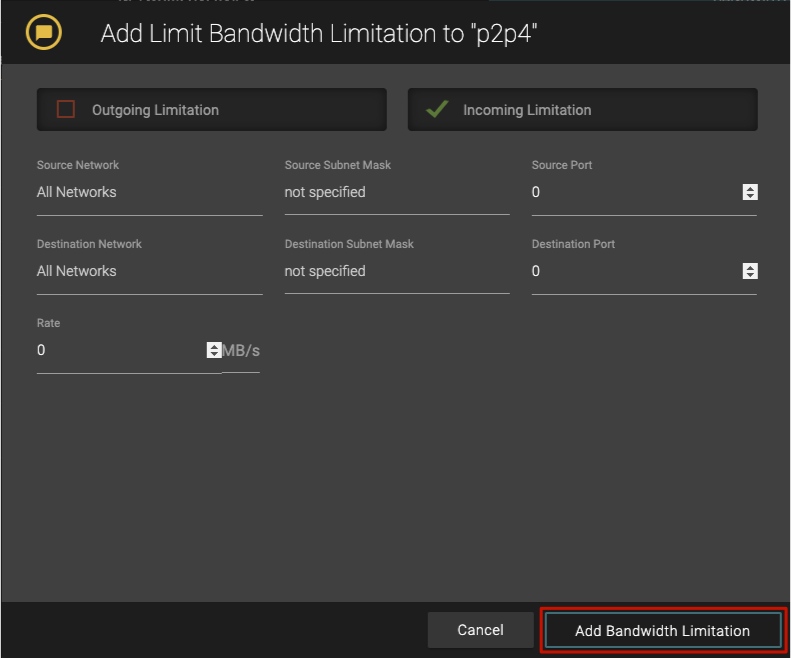
Adding a Limitation Rule
Press the plus button to add a new limitation rule.
Choose wheter this is an incoming, outgoing or both-directions rule. The bandwidth limitation options are explained below.
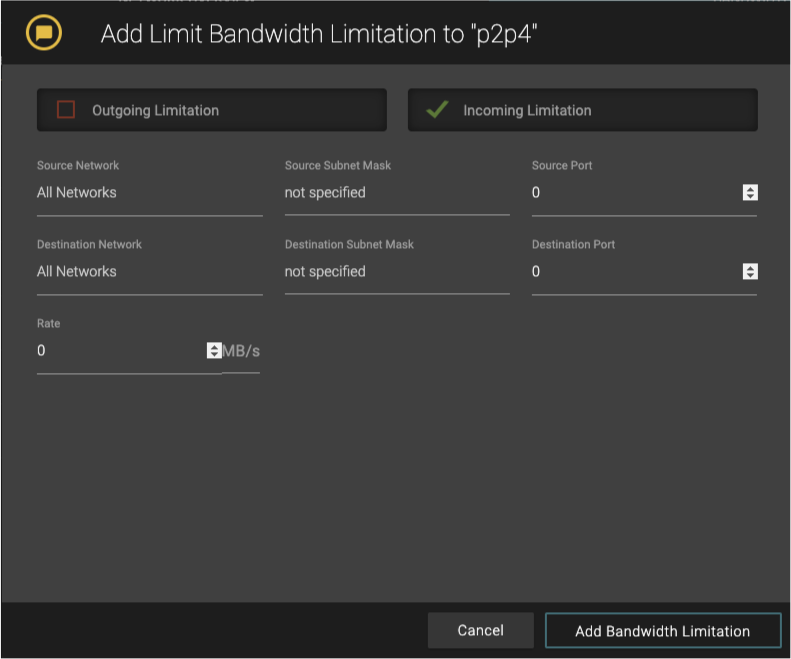
Press the Add Bandwidth Limitation button when you’re done.
The rule should now be reflected in the overview.

Get more info about a rule by hovering above it with the mouse. On mobile devices, tap a rule once.
Bandwidth Limitation Rule Options
Source Network: the IP address of the source (optional). This is required if you use multiple connections on a device.
Source Subnet Mask: enter the subnet mask of the source (optional).
Source Port: set the port for an specific application. Use “0” if you do not want to specify a specific port.
Destination Network: the IP address of the destination (optional). This is required if you use multiple connections on a device.
Destination Subnet Mask: the subnet mask of the destination (optional).
Destination Port: set the port for an specific application. Use “0” if you do not want to specify a specific port.
Rate: set the maximum rate of the interface in MB/s.
Changing a Bandwidth Limitation
Press the Edit button

Edit the bandwidth limit to your needs. The bandwidth limitation options are explained above.

Press the Change Bandwidth Limitation button when you’re done.

The changes should now be reflected in the overview.
Get more info about a rule by hovering above it with the mouse. On mobile devices, tap a rule once.
Deleting a Bandwidth Limitation
Deleting a rule in the column Incoming Rules will only delete this specific rule. The same is true for Outgoing Rules.
Press the Delete button on the rule your want to remove.

Confirm the dialog if you are sure. The deletion cannot be undone.
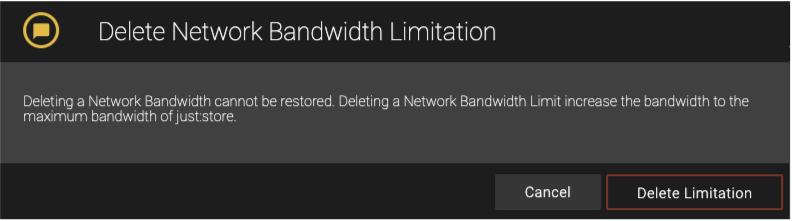
The changes should now be reflected in the overview.

Deleting all Bandwidth Limitations of an Interface
Hover above the name of the interface of which you want to delete all limitations. On mobile devices, single tap on the name of the desired interface.
Press the X button on the very left.
Confirm the dialog if you are sure. The deletion cannot be undone.
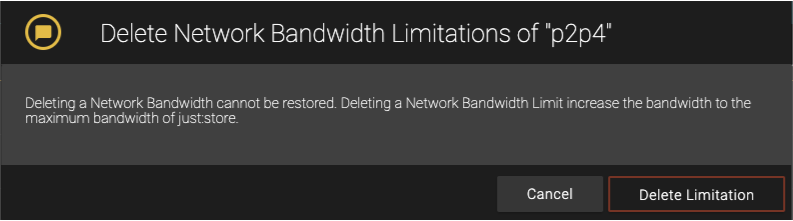
The changes should now be reflected in the overview.
Please keep in mind changing the limitations can change network speed at the time you apply your changes.