...
User Interface Main Parts
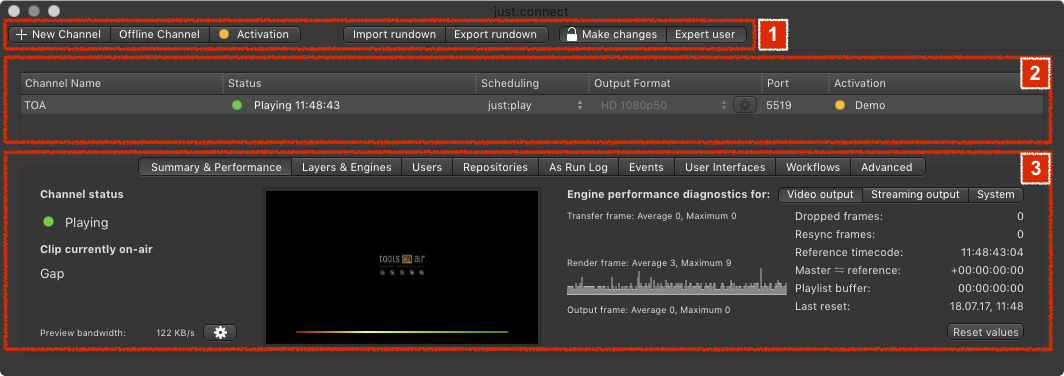
1. Menu Bar: Gives you direct access to the most important functions of just:connect.
2. Channel View: Lists all Channels managed by this just:connect and shows an overview of the status of each Channel.
3. Configuration Area: Here you can change the setup of your Channel.
...
|
|
Menu Bar
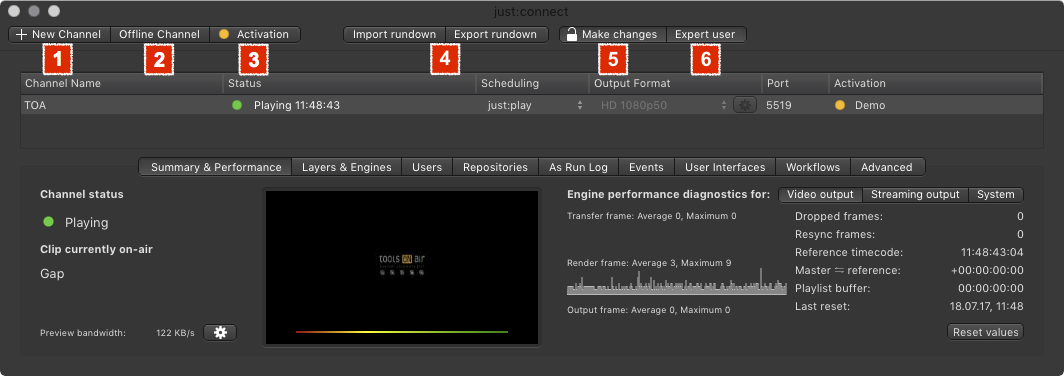
New 1. New Channel: Opens the New Channel Wizard which allows you to configure and add a new Online Channel. Make sure you have all the information needed to make a new Channel, like the Channel name, the repository folders and the hardware device you are going to use.
Offline 2. Offline Channel: Creates a new Offline Channel. Because an Offline Channel gets all its attributes from an existing Online Channel, an Online Channel must be selected before.
3. Activation: Opens the activation window to show the machine ID (required to activate the Channel) and the status of the activated functions.
 Import4. Import/Export Rundown: Allows you to save/load all Playlists of a certain day to one or several days or to the Playlist repository folder of just:live/just:play. Operators can use it later for individual days.
 Make 5. Make changes: Before you can make any changes within just:connect it must be unlocked first. Clicking this button asks for the administrator password of the machine and then unlocks just:connect.
 Expert 6. Expert user: Enables access to advanced functions.
Channel View
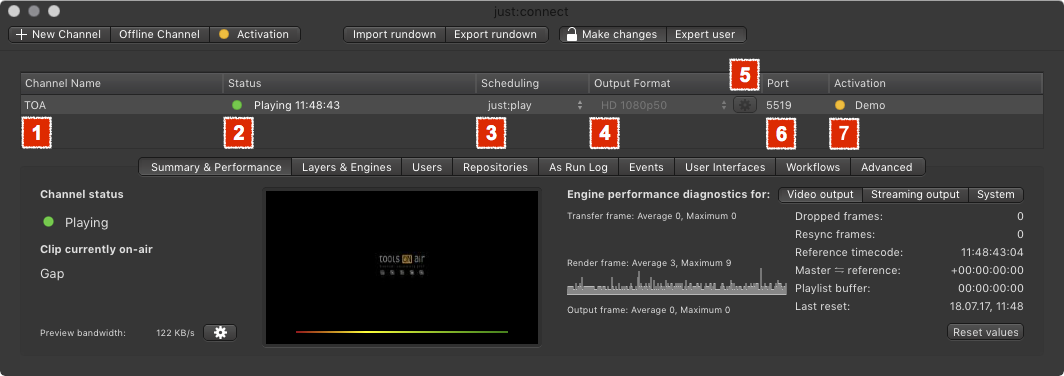
Channel 1. Channel Name: Names of the Channels. Double clicking the Channel name allows you to change it.
2. Status:
- Green: The Channel has a just:out engine assigned to it and the connection could be established.
- Yellow: There is no connection to the assigned just:out engine.
- Gray: There is no just:out engine assigned to the Channel (Offline Channel).
3. Scheduling: Type of user interface (either just:live or just:play) which is allowed to connect to the Channel.
Output 4. Output Format: Output format of the Channel. just:out must be quitted to be able to do this.
Advanced 5. Advanced Options: Clicking the sprocket shows advanced Channel options. just:out must be quitted to be able to do this.
Port6. Port: Port which is used by the Channel. Double clicking the Port allows you to change it.
 Activation7. Activation: Shows the status of the activation for this Channel. An orange light means not activated or temporary license (with the expiration date). A green light means activated.
Configuration Tabs
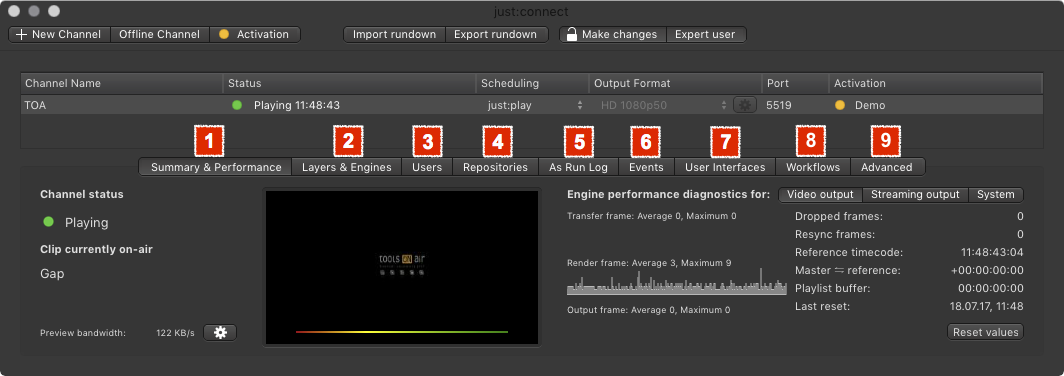
1. Summary & Performance: Channel status and engine Diagnostics of the Video- and the optional RTMP streaming output. Clicking on the sprocket in the lower left allows you to change the Proxy Preview quality.
Layers 2. Layers & Engines: Shows the amount and type of activated Layers of the selected Channel. Here you can also assign Graphic elements to an FX Layer, which should be on air by default (infinite graphics) and you can define which engine is used for each layer.
Users3. Users: List of users which are allowed to access the selected Channel. You can define the level of access a certain user has and also assign a password to a user.
Repositories4. Repositories: Repositories define the paths to Videos, Graphics and Playlists (just:live/just:play user interface clients only) which a client can use. You can define multiple paths which can point to local disks or remote locations like NAS/SANs and file servers. The repository paths will show up in the Library of the just:live/just:play client.
As5. As-Run Log Folder: Allows the desired just:out to write a log file from the Playout to a predefined location.
6. Events: Define Router and GPI Events for the selected Channel by using a serial connection, a MOXA Ethernet to serial device or an Ethernet based connection. The crosspoints are later defined in the just:live/just:play user interface.
User 7. User Interfaces: By default just:connect allows all users to access a Channel, based on the user rights defined in the Users tab. Use this tab to restrict access to certain users, including the repositories they should use.
 Workflows8. Workflows: Activate and configure onCore-based workflows like Failover control and FAB subtitling. → contact us for more information.
 Advanced9. Advanced: Activate and configure advanced functions like Redundancy and Default Gap Playlists.
...