...
ToolsOnAir – Broadcast Engineering GmbH VAT ID: ATU 64362718 Software and user guides described in this document are protected by copyright. No reproduction, distribution or use in whole or in part of any content is permitted without prior authorization of ToolsOnAir – Broadcast Engineering GmbH ("ToolsOnAir"). Any use, for any purpose, not allowed in the terms of the license is strictly forbidden. ToolsOnAir – Broadcast Engineering GmbH uses reasonable efforts to include accurate, complete and current information in this document, however, ToolsOnAir – Broadcast Engineering GmbH does not warrant that the content herein is accurate, complete, current, or free of technical or typographical errors. ToolsOnAir – Broadcast Engineering GmbH reserves the right to make changes and updates to any information contained in this document without prior notice. ToolsOnAir – Broadcast Engineering GmbH shall not be responsible for any errors or omissions contained in this document, and in particular ToolsOnAir – Broadcast Engineering GmbH shall not be liable for special, indirect, consequential, or incidental damages, or damages for lost profits, loss of revenue, or loss of use, arising out of or related to the information contained in this document, whether such damages arise in contract, negligence, tort, under statute, in equity, at law or otherwise. All rights reserved. © 2016 ToolsOnAir – Broadcast Engineering GmbH |
Table of Contents
...
Main Screen
The main initial screen consists of 3 |
areas, as following; |

|
|
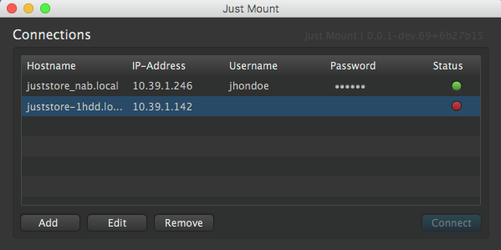
YOUR USERNAME HERE - Each SharePoint can have 2 different types of authentication - Guest and User (This info can be found in your just: store UI ( formerly flow: rage ). If your SharePoint require no Authentication (Guest), you can leave this field blank. If some SharePoint requires authentication, it will just not be available to connect to the mount screen
Password - The last field
Configuration Screen
This is the area where you can configure multiple just: store if necessary and connect
according to with your workflow. You can activate this screen by clicking the gear button ![]()

After enter on the configuration screen, you can add a server by clicking,![]() or remove a server by clicking
or remove a server by clicking ![]()

The configuration screen consists of 5 fields, as following;
Name - In this field, you can give any name that makes sense to you or your workflow. You can name it as our example bellow, TOA-just store or just - media server and so on.
Host - Here you MUST enter the correct IP address where your just: store can be reached. If you are not sure, ping the server or call your administrator
Port - This is marked as "80" and it should never be changed unless instructed by TOA support personnel.
Status - If your just: store is accessible by the IP address entered in the Host field, this checkbox will appear checked automatically after you check the first field (as described in the first item)


Back to the initial screen, after click OK in the previous configuration, the target just: store configured will appear as an option to connect to. Now just follow the instructions from INITIAL SCREEN described above

|


...
|

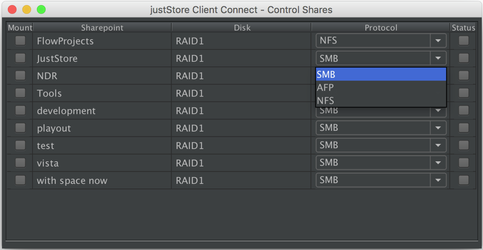
 Mount Screen
Mount ScreenThis screen allows you to mount or unmount interactively SharePoint from your target just: store 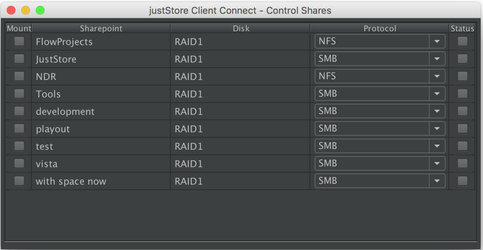 Lists all users on the system usernames NFS-hostnames and allows you to delete user accounts. The mount screen consists of 5 fields, as following;
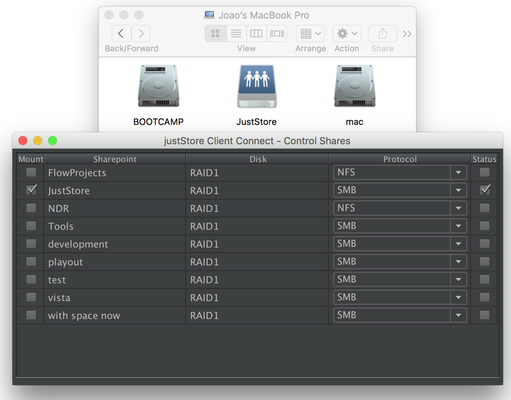
If this is the first time that you use just: mount, it will prompt you to type your administration password from the mac where you are running this software. If you enter the wrong password, the software will not be able to mount ANY SharePoint. 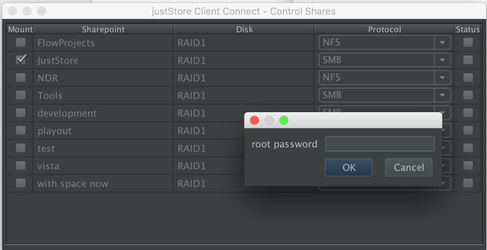 If the SharePoint is successfully mounted, the status checkbox will appear checked and the target SharePoint will appear as a network storage. All mounted SharePoint will be automatically saved and be mounted for your every time that you open your just: mount or every time that you executed just: automounter |
...