3. just:live User Interface Overview & Preferences (v2.5)
just:live User Interface Overview
The following figure assumes that just:live uses the default window layout. If that should not be the case, reset the window layout by using the menu View → Reset Window Layout.
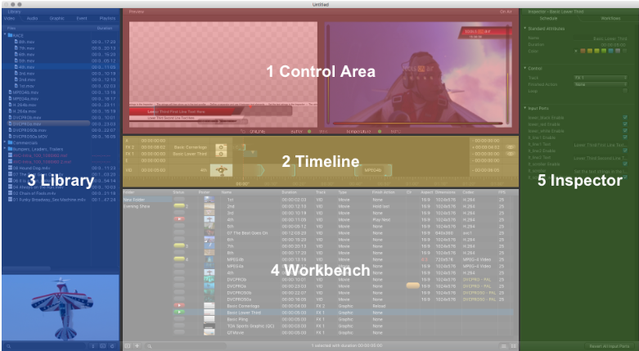
- Control Area:
- Preview View (left): Preview selected Video/Graphic elements or define a new in/out-point for a selected Video (using the yellow trimmer).
- On Air View (right): Shows the current On Air output depending on the settings in the just:live preferences.
- Status of the on air engine: Shows the buffer and CPU temperature of the on air engine with a "traffic light". Yellow lights mean a warning, while red lights mean something requires immediate attention.
- Timeline: Shows all Videos, Graphic elements and Events loaded or already playing out (including the element names, the elapsed/remaining time info and the Layers' Play buttons). The visibility of the final output is defined from top to bottom.
- Library: Divided in four tabs, the library shows Videos, Graphic elements, Events and saved Playlists. Related metadata will also be shown (if available). There's also a search field and a preview at the bottom.
- Workbench: This is the place where Videos, Graphics, etc… are collected for the final playout. Folders can help you to organize and manage complex shows. You can choose between a list view and the poster frame view. Use the view which fits your needs best.
- Inspector: Here you can modify attributes of one or multiple selected elements. Multiselection of several items of the same kind is supported.
just:live Preferences
The actual setup and configuration of a Channel is done in just:connect by your system administrator (number of activated Layers, usage of a FX Layer for the station ID ("bug"), user permissions for a particular Channel…).
The preferences described here are related to the just:live UI installed on a particular machine. To open the preferences, go to the menu Just Live → Preferences.
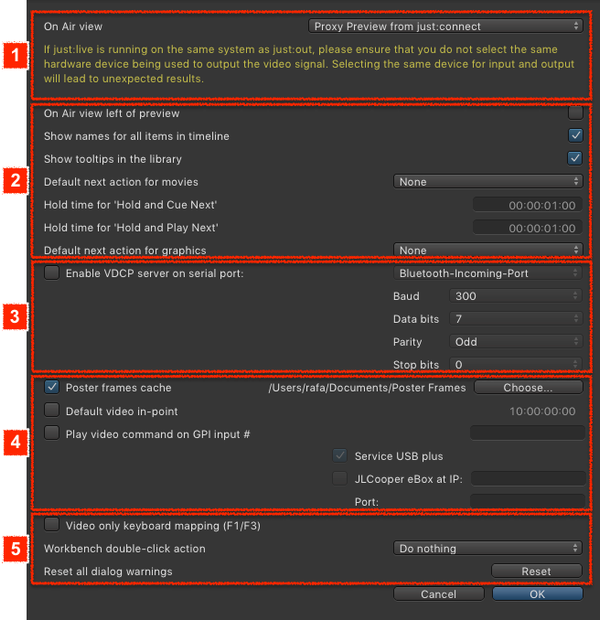
- On Air view: Here you can choose which preview is shown in the On Air View. The options are:
- No Live Preview: Removes the On Air View from the control area and shows only the Preview View.
- Proxy Preview from just:connect: Shows the current output incl. Videos and Graphics as well as audio bars (but not the passed through signal while playing a Live Event) in the On Air View. The preview changes when switching from one Channel to another.
- 2nd hardware device: Shows any signal which is connected to a Video device in the On Air View. This can also include the passed through signal while playing a Live Event. Switching from one Channel to another Channel does not change the preview, but will always show the signal connected to the hardware device.
- UI and Finished Action Settings
- On Air view left of preview: When enabled the On Air View is located to the left of the Preview View.
- Show names for all items in timeline: When enabled the name labels of all clips in the timeline are always displayed. When disabled the clip names in the timeline are only displayed when hovering above them with the mouse.
- Show tooltips in the library: Activating this option gives you additional info about an item in the library when you hover over it with the mouse for a short period of time. Disable this feature if you do not need tooltips.
- Default next action for Videos: This option allows you to predefine the default end action for every Video which is dropped into the workbench. This preset can be overruled later for each Video element using the inspector.
- Hold time for 'Hold and Cue Next': This setting allows you to define how long the last frame of a Video will be "held" before the next clip will be cued.
- Hold time for 'Hold and Play Next': This setting allows you to define how long the last frame of a Video will be "held" before the next clip will be played.
- Default next action for Graphics: This option allows you to predefine the default end action for Graphic elements which are dropped into the workbench. This preset can be overruled later for each Graphic element using the inspector.
- VDCP Server Settings: Enables the Video Disk Control Protocol Server (→ Third Party Support - VDCP and MOS). Contact your system administrator for the proper configuration (depending on the serial device you want to use).
- Additional Settings
- Poster frames cache: This defines the folder where poster frames will be saved. By default the poster frames are saved in the folder Poster Frames inside of the Documents folder of the current user. This option is enabled by default. Disable it to suppress the creation of new poster frames in the workbench of just:live.
- Default Video in-point: This option is disabled by default. Enable it to enter a timecode value. Once enabled the in-point of QuickTime movies which are dragged from the library into the workbench will be set to the specified value (assuming that the QuickTime movie contains timecode). This is useful if all of your QuickTime movies contain a trailer or countdown before the actual Video content starts.
- Play Video command on GPI input #: Here you can define the GPIin which should execute the play command. Once activated you can select the hardware you are going to use to receive the GPI command. When using the JLCooper eBox you must define the IP address and the port of the eBox, so just:live can connect to it.
- Additional Settings
- Video only keyboard mapping (F1/F3): Activate this checkbox to change the way the F1/F3 keys are working. By default F1 starts/stops the playout of the first Layer, F2 starts/stops the playout of the second Layer and so on. With this checkbox activated, F1 starts the playout of the first Layer and F3 stops the play out. Pressing the F1 while an item is playing has no function in this case.
- Workbench double-click action: Only available when the workbench is in list mode. This defines the action which is executed when double-clicking an item in the workbench.
- Reset all dialog warnings: Pressing the Reset button enables dialog warnings again.
Using the proxy preview from just:connect shows a compressed image with a reduced frame rate. In addition the preview can stop for a moment if the communication is interrupted, even when the real output is fine. This means that the preview cannot replace a broadcast monitor for the final check of the master playout.