13.5 Output Format Settings of a Channel (v2.5)
Changing the Output Format of a Channel
Each Channel has a certain output format (frame size and frame rate) in which the engines connected to this Channel are "rendering" the final output.
Before proceeding you must quit all interfaces and all engines which are connected to the Channel.
- Click on the format shown in the Output Format column.
- Select the format you would like to use from now on.
- The engines and user interfaces can be started after that.

When choosing a new output format which does not match the frame rate of the original setting, all playlists scheduled in the calendar view will be deleted. This can not be undone.
Advanced Output Format Settings
Opening the Advanced Output Format Settings
- Quit all interfaces and all engines.
- Select the desired Channel in the Channel View.
- Click on the sprocket next to the Output Format column in the Channel View.

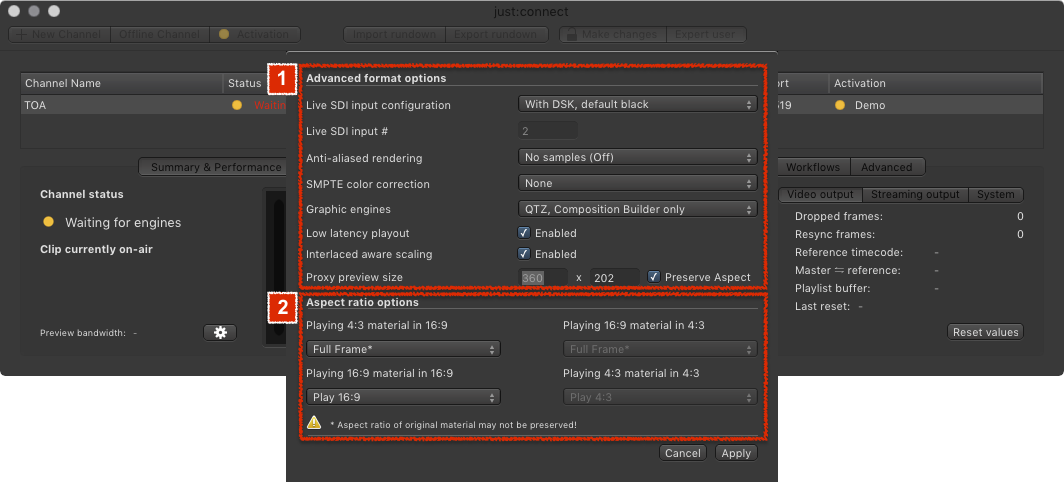
1. Advanced Format Options:
- Live SDI input configuration:
- Disabled, no Live Input: Disables the ability to switch to a Live Signal using the Video output device.
- With DSK: Enables the ability to switch to a Live Signal (refer to chapter Live Signal Handling). Once a switch to live setting has been selected it is possible to define the default output to be Black or the Live Source. The With DSK-based setting must be selected in case Fill & Key should be sent to a production mixer (refer to chapter DSK-Based Switch to Live Configuration).
- Without DSK: Enables the ability to switch to a Live Signal (refer to chapter Live Signal Handling and chapter Non DSK-Based Switch to Live Configuration).
- To enable the hardware to pass through CC data from the Live Source of an HD Channel, activate the 4K Firmware of the AJA Kona 4 card, select a Non DSK mode in just:connect and connect the Live Signal to SDI 2 (AJA) or SDI 1 (Blackmagic).
- CC data is only supported while using a Non DSK or Disabled Live SDI input configuration in the channel settings of just:connect. Selecting a DSK-basedmethod will disable the Playout of Closed Captions completely.
- The output of Closed Captions of an UHD/4K channel is not supported at the moment.
- Anti-aliased rendering: Anti-aliasing tries to counteract the jagged appearance of polygon edges. Enabling this function can have a considerable impact on the rendering performance of old or low-end GPUs. If you wish to use anti-aliasing, evaluate thoroughly if your system configuration is able to provide the required rendering capabilities.
SMPTE Color Correction: This settings allows you to handle the difference between the full color space (0–255) and the SMPTE color space (16–235).
- None: If your Videos and your Graphic files are using the SMPTE color space. This setting is also the default setting for SD Channels.
- Cropped: If the Videos are using the SMPTE color space and the Graphic files do not.
- Scaled: If your Videos and your Graphics files are both not using the SMPTE color space. This setting is also the default setting for HD Channels.
- Graphic engines: Selects the rendering engine. For additional information refer to chapter Graphic Elements.
- QTZ, Composition Builder only: Select this if you only want to play out QTZ and/or composition:builder Graphics (as well as simple image files).
- TOA Graphics, QTZ, Composition Builder: Select this to enable TOA Graphics Engine files (file ending "jscomposition") and Videos with audio to be played on an FX Layer. Note that this renderer disables the scaling functionality of the QTZ rendering engine which has a direct impact on the quality whenever the image is changed in its pixel dimensions (scaling and aspect ratio change). Therefore make sure to activate this feature only in case you do not need the scaling function but you do need the ability to play Videos with audio in one of the FX Layers.
- Low Latency Playout (just:live only): Enable this option for the lowest latency between pressing the Play button and the actual playout of a Video. Deactivate this option when using MXF files or Videos which are taking some time to decompress like XDCam or H.264.
- Interlaced Aware Scaling: When activated, any Video which has to be scaled (SD ↔ HD, aspect ratio conversion) will have additional interlaced-aware filtering applied to it in order to preserve the interlace fields and to improve the quality of the scaled Video.
- Proxy preview size: Here you can define the pixel size of the proxy image which is generated inside the just:out engine defined for this Channel. This proxy image is shown in just:connects Summary & Performance tab as well as the On Air window of just:live and just:play.
2. Aspect Ratio Options:
Define how differences of the aspect ratio should be handled. This preset can be overwritten for each Video in the Inspector of just:live/just:play. You can also change the aspect ratio of Videos which match the engine's aspect ratio but have been saved in the wrong aspect ratio. Refer to chapter Aspect Ratio Control.
Proxy Preview Pixel Size
| Reduce the Pixel Size | Increase the Pixel Size |
|---|---|
|
|
In addition to the pixel size the frame rate and the compression can be adjusted. This cannot be done for each Channel individually, but for all Channels which are administrated by the same just:connect. Refer to chapter 13.9 Checking The Status Of A Channel.
Increasing the proxy preview size can harm the final output. So check the output signal as well as the dropped frame counter in just:connect every time you change the pixel size of the proxy preview.