7.1 Final Cut Pro & Adobe Premiere Workflow
Press "Cmd + P" to bring up the project settings. These settings do affect the generation of the Final Cut Pro XML. Some settings will be set once, others will change from take to take. All of them are active, meaning that every change effects the processing as soon as entered. These settings cannot be changed during recording.
Never change these settings after your recording has finished, as it effects the generation of QuickTime file names and other metadata. Doing so will result in errors in the XML structure and your media will be showing up offline in the Final Cut Pro or Adobe Premiere Pro project.
 Project Settings
|
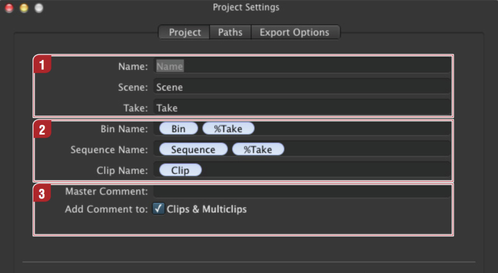
| Name, Scene, Take: Used to identify and organize the project. |
| Bin Name, Sequence Name, Clip Name: Those three fields are fixed variables, meaning that you can define a scheme on how to build up these names from variables. Please see the next chapter for further explanation. | |
| Master Comment (only available in Final Cut Pro 7): Enter your comments of the take. This information shows up in the Final Cut Pro master comment column. Usually this is entered in the main window, or after the recording in the stop-record window. |


Variables
A variable is indicated by a leading "%" and a colored background. Simply type in "%" before the variable definition and press the tab key to turn it into a variable. Variables can be rearranged using drag-and- drop. Fixed variables can be used by entering them without a leading "%".
%Name | Corresponds to the "Name" field in the LiveCut main window. |
|---|---|
| %Scene | Corresponds to the "Scene" field in the LiveCut main window. |
| %Take | Corresponds to the "Take" field in the LiveCut main window. |
| %Date | Corresponds to the current date (updated whenever a change is made in any field). |
| %Time | Corresponds to the current time (updated whenever a change is made in any field) . |
Path Settings
|
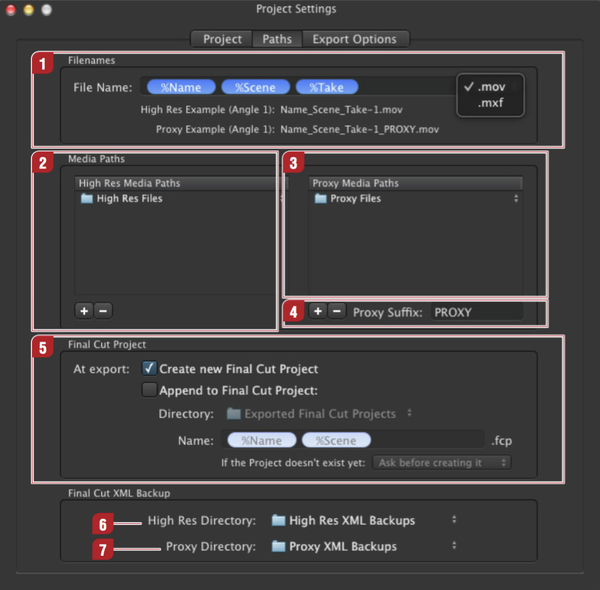
| Filenames: Define the pattern of the file name. The general naming convention shown here fits best for most needs. In the drop-down box on the right you can choose the media container.
Please read the note at the end of this chapter regarding the usage of MXF files in Apple Final Cut Pro or Adobe Premiere Pro. |
| High-Res Media Paths: Choose the location of the High-Res media files. This folder is the main location for your media and must point to the same volume path as the previously defined destination preset. This value is taken from the LiveCut preferences default settings, but can be overwritten here. | |
| Proxy Media Paths: Choose the location of the low resolution proxy QuickTime files. This folder is the main location for your proxy media. This value is taken from the LiveCut preferences default settings, but can be overwritten here. | |
| Proxy Suffix: This option is left for legacy purposes and does not effect LiveCut version 1.4.1. | |
| Final Cut Project: These settings handle the general export of the recorded take. Takes are immediately exported into a Final Cut Pro project file, whenever a recording is stopped or an export is initiated. The Final Cut Pro project file can be set in advance, thus enabling the possibility of an automated delivery to different Final Cut Pro project files. Example: if you want to create one Final Cut Pro project per day, choose "Append to Final Cut Project" and set the name of the project file to "%Date". A new Final Cut Pro project will then be created for every day. Any recorded take during this day will be delivered into this project. Available variables include: "%Name", "%Scene", "%Take", "%Date" and "%Time". | |
| High-Res Directory: Export location of the High-Resolution XML file. This backup folder can act as a watch folder for external MAM systems. | |
| Proxy Directory: Export location of the proxy resolution XML file. This backup folder can act as a watch folder for external MAM systems. |


Using MXF files within Final Cut Pro 7 and Final Cut Pro X requires the use of dedicated QuickTime plug-ins. Please contact your preferred ToolsOnAir dealer for more information.
LiveCut has the ability to ingest into an MXF OP1a container already built-in. Please contact your preferred ToolsOnAir dealer for more information about licensing the ToolsOnAir MXF option.
Export Options
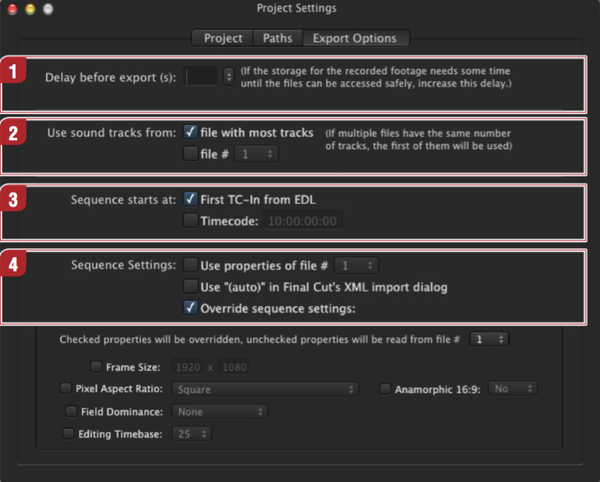
These settings affect the generated timeline. We recommend not to change these settings, as Final Cut Pro's "(auto)" settings are nearly bullet-proof.
|
| Delay before export: Use this feature to leave some "safety time" for closing the write process of the new media. Depending on the length of your recording, the storage system might need some seconds to finish moving the file. |
| Use sound tracks from: Choose your main audio source to be tracklayed in the timeline. | |
| Sequence starts at: Choose the timecode for the sequence. | |
| Sequence Settings: Choose the way Final Cut Pro handles the sequence. "(auto)" works very well, even though multi codec recording may require manual settings. If this is the case, select "Override sequence settings" and define your own sequence settings. Be aware that doing so, might affect your NLEs performance. |
When you are done with your project setup, choose "Save Settings" in the "Project" menu. Name your template, and save it. Saved settings can be selected whenever you launch LiveCut. You can create an unlimited amount of project templates. The templates are located in the folder "~/Documents/LiveCut Documents/Project Templates" and can be copied between workstations.