8. Capture & Destination Presets (just:in Engine Mac v3.0)
This chapter explains how to create, edit and delete Presets.
To make any changes you need to click on the Make Changes button in the lower left and enter the admin password.
Table of Contents
What is a Preset?
Presets define how a Capture will be done (codec, container, resolution…) and where the captured Video will be saved. Before you can do Recordings with the just:in User Interface you need to create one or multiple Capture and Destination Presets in the just:in Engine Preferences.
- Capture Presets contain Format and Container settings.
- Destination Presets contain settings about the desired write locations of the Recordings and Metadata files.
After defining Presets you can quickly access them in the just:in User Interface. This speeds up the Recording process and helps to keep things organized.
- We recommend to restart the just:in User Interface after changing Capture or Destination Presets.
- It is mandatory to have at least one valid Capture Preset and one valid Destination Preset before you can do any Recordings in the just:in User Interface.
Capture Presets
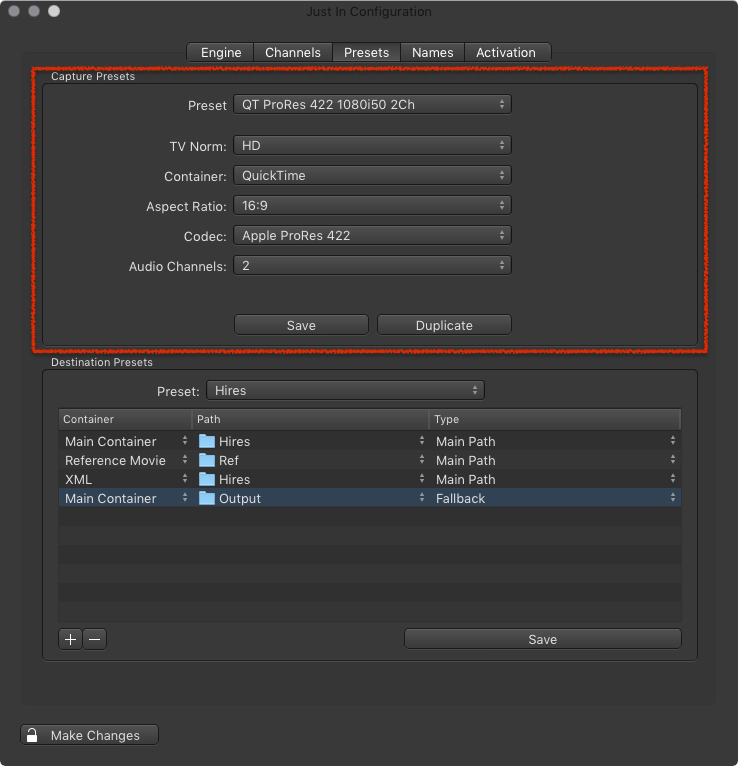
- Preset: shows all saved Capture Presets and is initially empty. Click the menu to and select New… to create a new Preset.
- TV Norm: select the desired TV Norm.
- Container: select the desired Container.
- MXF only: enable the Update Headers checkbox if you need the Container to automatically refresh the duration while recording.
- Aspect Ratio: select the desired aspect ratio.
- Codec: select the desired Codec. After selecting the Codec you may also be asked for the Framerate and Resolution.
- Audio Channels: select the number of Audio Channels. After selecting the number of Audio Channels you may also be asked for the Audio Track Alignment (Mono or Stereo).
- MXF only: all Channels will default to Mono.
The maximum number of Channels which can be recorded on a certain machine depends on parameters like codec, resolution and framerate of the selected capture preset and the performance of the machine. We strongly recommend to test any new presets made here before using it in a live production setup. Improper settings may lead to unexpected results.
Creating a Capture Preset
- Go to the Presets tab of the just:in Engine preferences.
- In the upper area under Capture Presets select New…

- Configure the preset accordingly to your needs.
- Press the Save button.
- A dialog appears. Enter the name of the Preset. Do not use following characters in the Preset name: / @ : | \ < >
- Press the Save button in the dialog.
- The Preset is now saved and available in the just:in User Interface.
Presets are stored in the folder /Library/Application Support/ToolsOnAir/Just In. You may duplicate, delete, or transfer them to another machine.
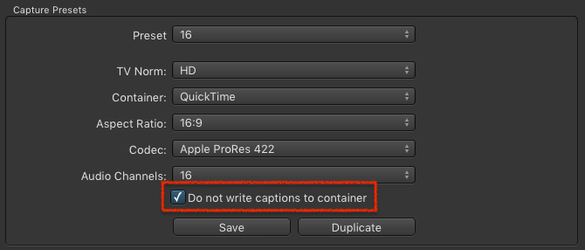
Do not write Closed Captions to container
If you do not want to record Closed Captions to the container, although there are Closed Captions at the input, then activate this option. When using this Capture Preset then, no Closed Captions will be recorded.
Editing a Capture Preset
- Go to the Presets tab of the just:in Engine preferences.
- Select a Capture Preset.
- Edit the Preset accordingly to your needs.
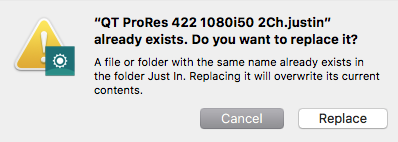
- Press the Save button and save the Preset under the same name.
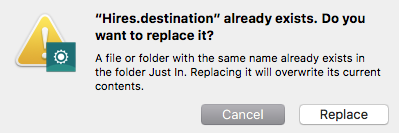
- A dialog asks if you want to replace the existing Preset. Accept the dialog to replace the Preset. This cannot be undone.
Duplicating a Capture Preset
- Select an existing Capture Preset.
- Press the Duplicate button.
- A dialog appears. Enter the name of the duplicate Preset. Do not use following characters in the Preset name: / @ : | \ < >
- Press the Save button in the dialog.
- The duplicated Preset is now saved and available in the just:in User Interface.
Deleting a Capture Preset
- Go to the folder /Library/Application Support/ToolsOnAir/Just In.
- Select the Preset(s) you want to delete.
- Delete the Preset(s).
Destination Presets
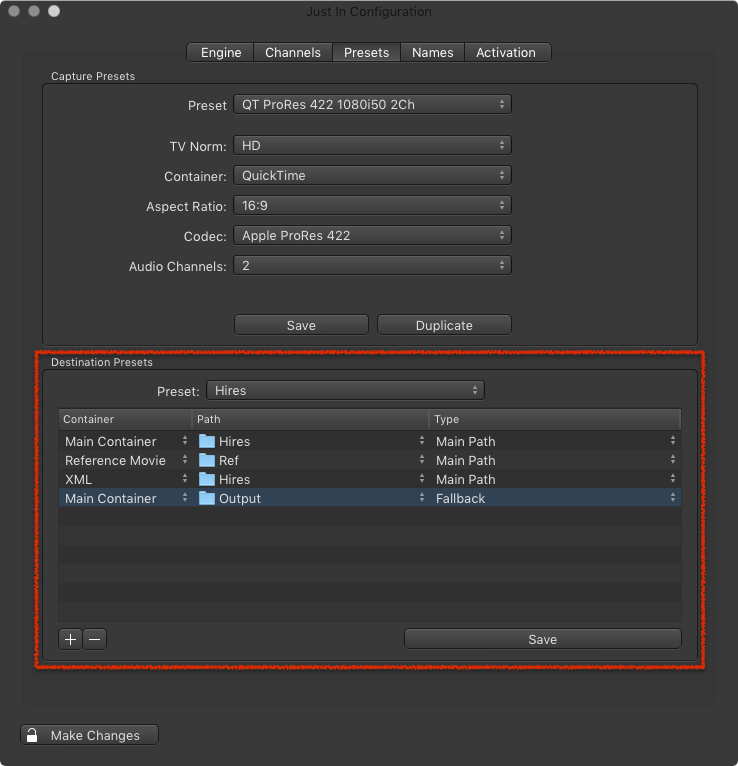
- Preset: shows all saved Destination Presets and is initially empty. Click the menu to and select New… to create a new Preset.
- Container Column: used to select a Container Type.
- Main Container: main path where the Recordings will be written to.
- Reference Movie: Reference Movie path (QuickTime 7 or Final Cut Pro X).
- XML: XML Metadata Sidecar files path. Refer to the chapter Customized Metadata XML.
- SCC: Scenarist Closed Captions path.
- Path Column: select the Path where the files will be written to.
- Type Colum: set the Path Type.
- Main Path: the main path (= primary storage).
- Fallback Path: fallback path for out-of-storage, network connection loss or even power outage scenarios on the storage side. just:in's safe-write logic will focus on having your recordings available for later use, as long as a power outage didn't affect any hardware components or any serious file system corruptions happened. The Fallback Path mechanism will only work as long as one or multiple fallback paths are defined here. When a fallback occurs just:in will continue writing on the fallback path and try to keep its frame accuracy while switching to another volume defined as the fallback destination.
Creating a new Destination Preset
- Go to the Presets tab of the just:in Engine preferences.

- In the lower area under Destination Presets select New…
- Add Paths to the using the plus button in the lower left.
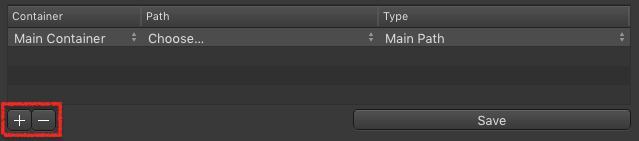
- Configure the Paths accordingly to your needs.
- Press the Save button.
- A dialog appears. Enter the name of the Preset. Do not use following characters in the Preset name: / @ : | \ < >
- Press the Save button in the dialog.
- The Preset is now saved and available in the just:in User Interface.
Presets are stored in the folder /Library/Application Support/ToolsOnAir/Just In. You may duplicate, delete, or transfer them to another machine.
Editing a Destination Preset
- Go to the Presets tab of the just:in Engine preferences.
- Select a Destination Preset.
- Edit the Preset accordingly to your needs.
- Press the Save button and save the Preset under the same name.
- A dialog asks if you want to replace the existing Preset. Accept the dialog to replace the Preset. This cannot be undone.
Duplicating a Destination Preset
- Go to the Presets tab of the just:in Engine preferences.
- Select a Destination Preset.
- Edit the Preset accordingly to your needs.
- Press the Save button and save the Preset under a new name.
Deleting a Destination Preset
- Go to the folder /Library/Application Support/ToolsOnAir/Just In.
- Select the Preset(s) you want to delete.
- Delete the Preset(s).