This chapter explains the Channel settings of the just:in Engine Preferences and how to enable a Channel for Capture, once it has been configured. To make any changes you need to click on the Make Changes button in the lower left and enter the admin password.
What is a Channel?
A Channel is a virtual representation of your Video Capture Device. Depending on the number of Capture Devices you have, you may configure one or multiple Channels.
Channels Tab
Depending on your Video device(s) the Channels tab may look differently.
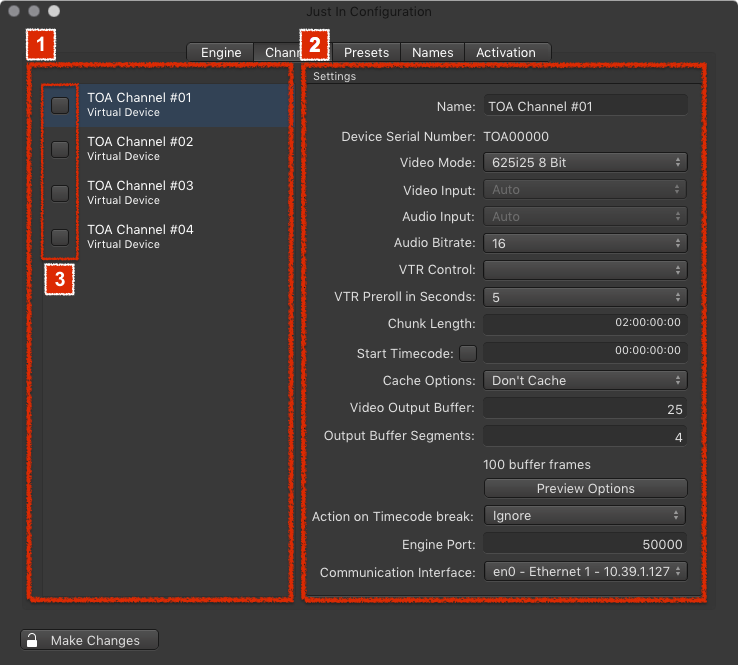
- Channel List
- Video Capture Devices: lists the Video Capture Devices which are available on the local machine. Selecting a Device in this list will show the Settings on the right.
- Checkbox: Clicking on the checkbox enables the Video Device for Capturing. At least the VideoMode and the AudioBitrate has to be definedbefore the channel can be activated. You need to uncheck the Device beforeconfiguring it.
- Name: the desired Channel name, which will also be displayed in the just:in user interface.
- Device Serial Number: shows the device serial number.
- Video Mode: select the Video mode. The mode has to match the video signal which is attached to the selected channel. If it does not match, a warning will be shown like described here.
- Video/Audio Input: select the Video/Audio input if your video device supports more than one input.
- Audio Bitrate: select the Audio bitrate (native 24-bit for AJA, selectable 16- or 24-bit for Blackmagic).
- VTR Control: select the serial RS-422 connection you want to use to control your VTR.
- VTR Preroll in Seconds: set the desired VTR preroll value in seconds (1-10). Default value is 5.
- Chunk Length: defines the maximum length of the recorded movie. The maximun Chunk Length is 12 hours, the default is 2 hours.
- When Recording does not reach the entered Chunk Length: clips will be automatically truncated to the expected recorded length.
- When Recording exceeds the entered Chunk Length: a new Recording (generating a new clip) will automatically be started.
- Start Timecode: enabling this option overrides the local time or incoming TC and makes every new clip start with the defined timecode value.
- Cache Options:
- Don't Cache (default): files are directly written to disk, no caching is done.
- Cache: tells the storage controller to cache data in order to flush it to disk later to improve write performance. If you experience low write performance, enable caching.
- Video Output Buffer (QuickTime only): number of A/V frames to flush to the storage system at once. If you want to flush once a second, just enter the Video framerate.
- Output Buffer Segments (QuickTime only): number of Buffer Segments. The Number of Buffer Segments multiplied by the Video Output Buffer (= storage flush size) is the total buffer size. We recommend not to exceed a total buffer size of 250 frames, otherwise the system may run out of RAM.
- Preview Options: you can manually override the resolution and framerate of the Video Previews of the just:in user interface. This may be helpful to increase performance when displaying many Channels in the just:in user interface. Explained in detail below.
- Action on Timecode break:
- Ignore: Channel ignores timecode breaks.
- Create new file: Channel creates a new file upon a timecode break.
- Engine Port: port to access the Channel from just:in over an IP connection. Default port for the first channel is 50000, 50001 for the second channel and so on. This does not have to be changed if the chosen ports are not in use on this machine.
- Communication Interface: select the network interface which should be used to establish a connection to the just:in user interface. Usually this will be the same interface which has been used as the Preview Network Communication Interface.
Channel Preview Options
When clicking the Preview Options in the Channel configuration you can set a custom resolution and framerate for the Channel Preview of the particular Channel.
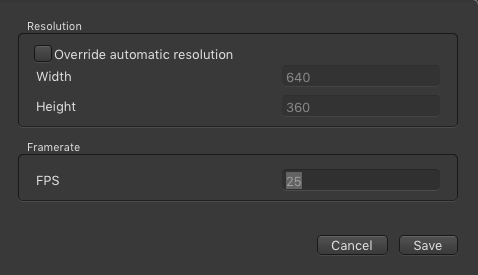
The default values are 640x360 for the resolution and 10 for the frame rate.
The resolution dimension and framerate you can define here highly depends on the the number of channels and the performance of the machine. Always test any changes made here before using it in a live production setup. Improper settings may lead to unexpected results.
Enabling a Video Capture Device
By default Video Capture Devices are disabled and thus can be configured. After configuring a Video Capture Device you need to enable it by clicking on the checkbox next to the Video Capture Device name. The Video Capture Device can now be used by the just:in user interface.
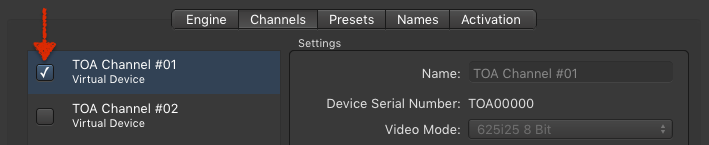
To change the Settings of a Video Capture Device you need so uncheck the corresponding checkbox first. Please be aware that the Channel goes offline then and will not be reachable by the just:in user interface. Once you enable the Video Capture Device again, just:in will reconnect to the Channel.