This chapter describes the set up of a Moxa NPort 5650 Serial Device Server in combination with just:in and a Blackmagic DeckLink Quad Video Card in order to control VTRs over dedicated RS-422 connections.
Important Note for macOS 10.13 ("High Sierra") Users
| Warning |
|---|
There is a problem with the Virtual Serial Device of macOS 10.13 ("High Sierra") where the Moxa device cannot connect properly. Customers using a Moxa device have to use macOS 10.12.6 or lower. Another option would be an AJA Corvid22, 24, or 44. |
Setting up the Moxa NPort 5650 Serial Device Server
This chapter describes the set up of a Moxa NPort 5650 Serial Device Server in combination with just:in and a Blackmagic DeckLink Quad Video Card in order to control VTRs over dedicated RS-422 connections.
- Open the just:in installation disk image.
- Open the folder Additional Content → Moxa.
- Copy the file moxadaemon.zip to your Applications folder and extract the ZIP archive.
- After extracting the ZIP archive, delete it. There should be a folder called moxadaemon now.
- Open the Terminal app and type "defaults write com.toolsonair.justin moxa 1" (without quotes).
- Press the enter key.
- In the moxadaemon folder open the file moxattyd.cf.
- Add all required Ports in following notation (this example defines 4 Channels and 4 Devices):
- ttyp0 <ip _ address _ moxa _ device> 950
- ttyp1 <ip _ address _ moxa _ device> 951
- ttyp2 <ip _ address _ moxa _ device> 952
- ttyp3 <ip _ address _ moxa _ device> 953
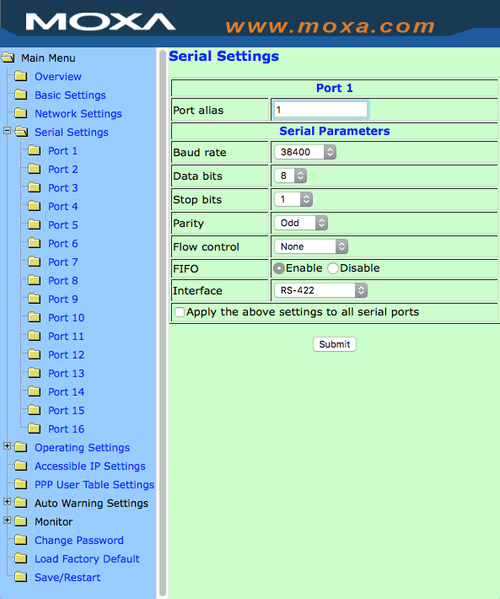
- Configure the Serial Port on the Moxa NPort 5650 Device by connecting to the Moxa using a web browser.
- When connected to the Moxa device click on Serial Settings and then on the desired Port to configure it.
- Press the Submit button for each configured Port.
- Launch the moxattyd daemon by entering the following commands in the Terminal:
- cd /Applications/moxadaemon
- ./moxattyd
- Add the daemon to the log in items to start the daemon automatically the next time the computer is restarted.
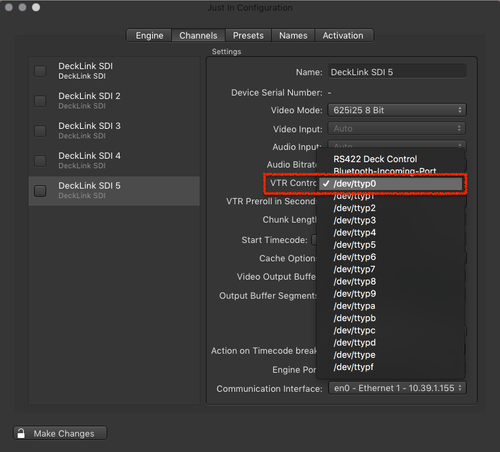
- Open the just:in Engine Preferences and select the desired Device. You are now ready to use the serial connections.
RJ45 to RS-422 Wiring
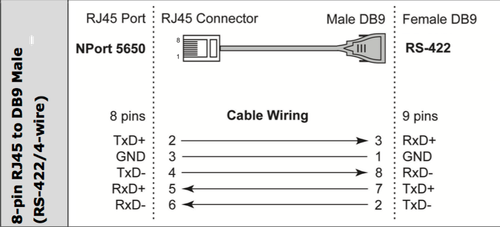
Make sure the RJ45 to RS-422 cable uses the following pin layout which is different compared to the DB-9 cables for computer usage.


