...
- automatically in the background using just:connect or an on:core based workflow
- but also manually using the Workflow tab in the Inspector of the user interface.
Here we describe how you can configure a workflow in just:connect.
| Gliffy | ||||||
|---|---|---|---|---|---|---|
|
 1 Add local workflow: Click on the button Local workflow and select an on:core based workflow file to add it to the selected channel.
 Add 2 Add remote workflow:
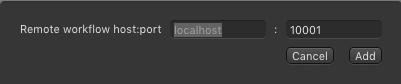
| Clicking on the button Remote workflow allows you to to define the IP address and the port of an on:core based workflow, which is installed on another machine. |
 Add 3 Add standard workflow:
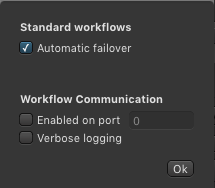
| Clicking on the button Standard workflow opens a new window which allows to:
Click OK to take over the changes you have made. |
 Project4 Project/Workflows: Shows all on:core based workflows which have been activated on the selected machine.
 5 Connection/Ports/Events: Clicking on the arrow to start the workflow, clicking on the sprocket allows to change the attributes of the workflow. Click on the "X" to stop the running workflow, so that the attributes of the workflow can be changed.
 Workflow 6 Workflow status: Shows the status of the workflows which are available on the selected channel.