| Table of Contents |
|---|
Once you are done with the configuration of the presets, close the just:in preference panel and restart the just:in Engine application. The engine application will start up and display information about each channel that has been previously activated in the preference panel. Congratulations. You are only a few steps away from your first recording!
If everything has been configured properly, the just:in Engine window will display the number of activated channels, the owner of the channel, the port number of the channel, the chosen video mode, the frames currently buffered and information about the engine’s status. By clicking on the Show channel log button you will be automatically directed to the log information for the given channel.
Arranging the just:in Engine window to be in front of others
If you want to arrange the just:in Engine diagnostics window in front of others, then select the option “Always on top” from the Window Menu of just:in Engine.
Connecting to channels over IP with the just:in User Interface
Start the just:in UI and click on the Connection-Button or just select a channel and press cmd + k. Then a new window appears where you have to enter the IP Address of the machine where the engine is running and then enter the port number of your channel. When you are done with this, press "Add" and the channel will added to the connection list. (Channel Name appears after first connection) Then you can press the connect button and the connection to the channel will be established.
| Info |
|---|
Please make sure that you are using the correct IP Address and Port number. |
Changing Channel Settings (Inspector)
You are now ready to proceed with your first recording. Select the appropriate capture and destination presets, then press the Record button. You will be recording in Crash mode.
Once you have connected a channel to the interface, you can see the incoming video stream, as well as the audio meters. Furthermore you can open the inspector by pressing on the settings button, which will appear when you move with your mouse inside the preview or you can simply select the channel and press cmd + i.
In the inspector your can set the file name, timecode source, metadata and the capture- and destination presets. To start a recording you have to select at least one capture- and destination preset.
The recording button appears as soon as the channel settings are ok.
| Info |
|---|
Please make sure you have valid channel settings configured, unless the recoding button will not appear. |
To start a recording, simply press on the record button or use cmd + r. When a currently recording channel is selected, the channel border will flash between red and cyan. You can stop a recording by using cmd + r or by just pressing the recording button again.
Multiselection
With v2.5 it is possible to change settings of two or more channels at the same time. Just select the channels and then press the settings button or hit cmd + i to open the inspector. Then make the changes and these are applied to all selected channels.
The Inspector is used to select your Capture Settings (such as Naming, Metadata, Capture and Destination Presets…). This chapter explains all Inspector options and also shows how the Inspector changes depending on the currently selected Recoding Mode.
| Table of Contents |
|---|
| Warning |
|---|
Before you are able to use the Inspector it is mandatory that the just:in user interface is connected to a Channel which is configured and running in just:in Engine. Refer to the chapter just:in Engine if you have not yet configured the Channel(s) yet. |
General Inspector Overview & Crash Recording Inspector
| Info |
|---|
For detailed information on how to make a Recording please refer to the chapter Capture Modes (just:in v2.5). |
The Inspector changes depending on the Recording Mode you are using. This shows the Inspector when in Crash Recording Mode.
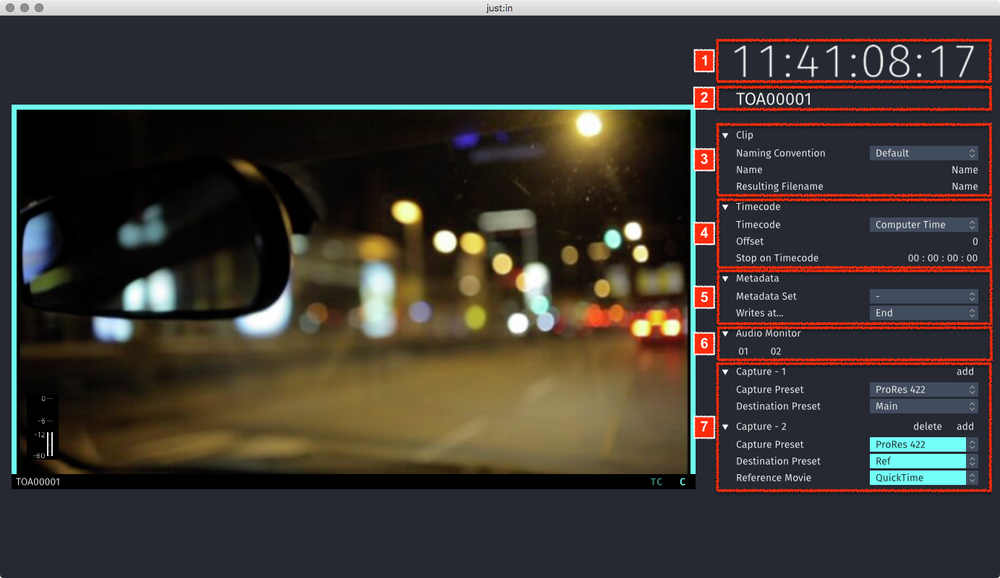
- Timecode: Timecode of the Channel.
- Channel Name or Connection Info (click to toggle).
- Clip
- Naming Convention: select one of the Presets which have been configured in just:in Engine.
- Variables: visible in this figure as Name or Angel, this list may differ – depending on your Naming Presets.
- Resulting Filename: shows the resulting Filename based on the elements of the selected Naming Preset. The file name used for the recorded Video can be different if the filename already exists.
- Timecode
- Timecode: select a Timecode source, like Computer Time, VTR, LTC…
- Offset: define a Timecode offset.
- Stop on Timecode: define a Timecode where to stop the Recording.
- Metadata
- Metadata Set: you can select a Metadata set, for example QuickTime. This provides several predefined Metadata fields for you to fill.
- Writes at: select whether the Metadata will be written at the Start or at the End of a capture.
- Audio Monitor: you can listen to the Audio stream of the incoming Signal to preview the Audio part in addition to the Video preview. This is for previewing only and will not replace a hardware device to check the audio quality or AV synchronisation. (Please update to macOS 10.13.3 to enable this function on a new Mac Pro)
- Enabling/Disabling a Single Audio Channel: click on the desired Audio Channel to enable/disable the Audio Preview.
- Enabling/Disabling all Audio Channels: hold the option key while clicking on any Audio Channel to enable/disable the Audio Preview for all Channels.
- Captures: add or remove Captures by using the add and delete buttons.
- Capture Preset: select one of the Presets which have been configured in just:in Engine.
- Destination Preset: select one of the Presets which have been configured in just:in Engine.
- Reference Movie (depending on Destination Preset): select the type of Reference Movie.
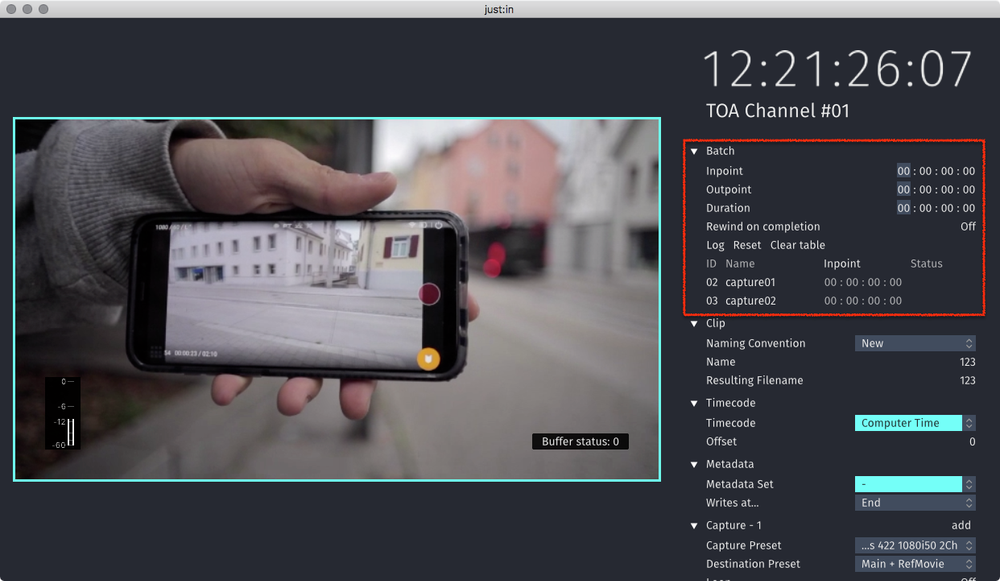
Batch Recording Inspector
| Info |
|---|
For detailed information on how to make a Recording please refer to the chapter Capture Modes (just:in v2.5). |
The Inspector changes depending on the Recording Mode you are using. This shows the Inspector when in Batch Recording Mode.
- Inpoint: the Capture Inpoint.
- Outpoint: the Capture Outpoint.
- Duration: the Capture Duration.
- Rewind on completion: enable this to rewind on completion.
- Log button: logs the previously defined Capture.
- Reset button:
- Clear table button: clears the Batch Log table.
- Batch Log Table: lists Batch Recordings which have been added with the Log button.
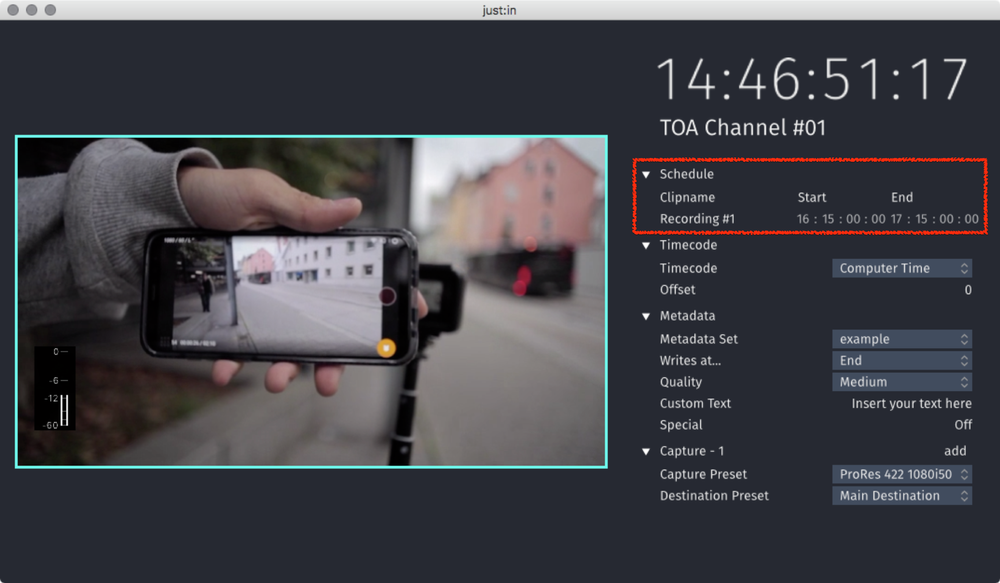
Scheduled Recording Inspector
| Info |
|---|
For detailed information on how to make a Recording please refer to the chapter Capture Modes (just:in v2.5). |
The Inspector changes depending on the Recording Mode you are using. This shows the Inspector when in Scheduled Recording Mode. At the top of the Inspector all Apple Calendar Events for that particular Channel are listed.